Microsoft Purview deployment models — full Markdown conversion
This collection preserves the full source content of Microsoft’s deployment models, fetched 7 September 2026. Each model combines its introduction and deployment steps while retaining the original section order, wording, numbered procedures, nested lists, tables, examples, notes, tips, warnings and contextual links. Every blueprint is also transcribed into searchable text and tables, with Mermaid used for appropriate relationships.
The previous collection is preserved unchanged under summaries. This collection was rebuilt from freshly fetched Microsoft HTML rather than expanded from those summaries.
Read the models
| Model | Full guide | Source pages |
|---|---|---|
| Overview | Microsoft Purview deployment models | 1 |
| 1 | Secure by default with Microsoft Purview | Introduction + 4 steps |
| 2 | Prevent data leak to shadow AI | Introduction + 4 steps |
| 3 | Secure and govern Microsoft 365 Copilot agents | Introduction + 4 steps |
| 4 | Deploy and use Data Security Posture Management | Introduction + 4 steps |
| 5 | Lightweight guide to mitigate data leakage | Introduction + 3 steps |
| 6 | Reduce false positives by using SITs and advanced classifiers | Introduction + 4 steps |
For the section that prompted this rebuild, open secure by default — Step 4. Its individual expansion scenarios, 5×5 guidance, group-encryption procedure, migration/upload behavior, accountability actions and implementation links are retained in place.
How the conversion preserves content
- Article text: retained in full, including repeated navigation and summaries. Each source page has a named anchor and direct Microsoft source link. Heading levels are shifted only to fit the combined file; headings keep their wording and hierarchy.
- Procedures and examples: kept with their original section and sequence. Repeated advice remains where the source places it.
- Tables: all source rows and cells are retained. Line breaks inside cells use
<br>so dense settings remain one coherent row. Label descriptions and settings remain together. - Contextual links: external references stay beside the relevant guidance. Links to the 30 converted model pages point to the corresponding local section. Supporting feature articles remain external references; they are not recursively converted.
- Source callouts: Note, Tip and Important callouts retain their labels and full text, displayed as blockquotes.
- Images: each original image position links to the original asset and the full text/table transcription in its model. The transcription appears once per model and records every activity, outcome, effort value, product marker, caption and meaningful relationship. Decorative graphics are described rather than recreated. The separate secure-by-default thumbnail and full image are both registered.
- Mermaid: preserves stage order for roadmaps, uses undirected connections for the DSPM architecture, and keeps the DSPM operating ribbon separate. The classifier comparison uses tables without inventing a dependency sequence.
- Editorial content: this index, the completeness register, navigation aids, conversion conventions and editorial notes are explicitly separate from Microsoft’s article text. Source inconsistencies are retained rather than silently rewritten.
Completeness checks
The source and completeness register maps all 30 pages to their new locations. The rebuilt Markdown was rendered and independently compared with source HTML:
| Check | Coverage |
|---|---|
| Article text and ordering | All 30 pages match after whitespace normalization; case, punctuation, digits and word order are retained |
| Headings | 229 headings, including page titles; hierarchy checked |
| Lists | 622 list items; ordered/unordered type and nesting checked |
| Tables | 11 source tables, 51 data rows; each cell checked |
| Contextual links | 403 occurrences; text, destination and position in the link sequence checked |
| Source callouts | 28 source callouts |
| Images | Seven fetched assets, representing six blueprints; visual transcription reviewed separately |
| Previous collection | All 10 summary files preserved byte-for-byte |
The verification report explains the checks and their limits, with links to the recorded results. Content fidelity is distinct from whether a source configuration is supported in a particular tenant or current product release.
Attribution and scope
Source article text and original diagrams are Microsoft material. Each source block and image transcription links to its origin. Source wording is retained; format, navigation and diagram representation are adapted as described above. See Microsoft Learn terms of use for the source’s usage terms.
The scope is the overview and its six models, including all 23 deployment steps and seven image URLs. The overview’s separate Secure and Govern Microsoft 365 Copilot blueprint remains an additional contextual link. Linked product manuals, licensing pages and third-party examples are outside the conversion boundary. Microsoft site chrome, account prompts, feedback widgets and decorative branding are outside the article content.
Conversion note (editorial): The source article text, examples, procedures, callouts and contextual links are retained. Section heading levels and model-navigation links are adapted for this combined Markdown file. Source claims are reproduced as published; separate editorial notes do not alter them. Diagrams are transcribed separately below.
Microsoft source · Retrieved 7 September 2026.
Microsoft Purview deployment models
Microsoft Purview provides integrated solutions and features that complement each other. For new Microsoft Purview administrators, it can be overwhelming to know where to start. But even existing administrators might be unfamiliar with how some Microsoft Purview features can enhance their data security.
To address the need for shorter, actionable, and prescriptive guidance, the Product Engineering team is releasing a new series: Microsoft Purview Deployment Models. Deployment models are scenario-based and include a comprehensive step-by-step guide to jumpstart your deployment.
Audience
IT professionals, security professionals, and compliance officers who are responsible for deploying and managing Microsoft Purview in their organization. They don't provide detailed technical guidance but rather a high-level overview of the deployment process for a configuration that meets a specific business need. If you're new to Microsoft Purview technologies, concepts, and planning, deployment, and administration, see Learn about Microsoft Purview.
Deployment models come from our engineering teams. They're based on proven deployments with organizations. The objective of deployment models is to enable organizations to accelerate securing content and deploy faster.
Secure by default with Microsoft Purview
Source diagram — Secure by default with Microsoft Purview (IMG01: original image). Full text/table diagram conversion.


Use this deployment model to help rapidly implement a secure by default configuration with Microsoft Purview Information Protection, Data Loss Prevention, and Insider Risk Management.
- Introduction
- Step 1: Start with default labeling
- Step 2: Address files with the highest sensitivity
- Step 3: Expand protection to your entire Microsoft 365 data estate
- Step 4: Operate, expand, and retroactive actions
Prevent data leak to shadow AI
Source diagram — Prevent data leak to shadow AI with Microsoft. (IMG02: original image). Full text/table diagram conversion.


Use this deployment model to help your organization identify and prevent data leaks to shadow AI by using Microsoft Purview, Microsoft Defender for Cloud Apps, Microsoft Entra, and Microsoft Intune.
- Introduction
- Step 1: Discover AI apps
- Step 2: Block access to unsanctioned AI apps
- Step 3: Block sensitive data going to sanctioned AI apps
- Step 4: Govern data sent to AI apps
Secure and govern Microsoft 365 Copilot agents
Source diagram — Secure and govern Microsoft 365 Copilot agents with Microsoft Purview. (IMG03: original image). Full text/table diagram conversion.


Use this deployment model for Microsoft 365 Copilot agents by securing both the grounding data and interactions with Microsoft Purview.
- Introduction
- Step 1: Discover risks and identify gaps
- Step 2: Protect sensitive info in grounding data
- Step 3: Protect interactions
- Step 4: Govern interactions
Deploy and use Data Security Posture Management
Source diagram — Deploy and use Microsoft Purview Data Security Posture Management (DSPM). (IMG04: original image). Full text/table diagram conversion.


Use this deployment model to prepare for a Data Security Posture Management (DSPM) deployment with step-by-step guidance.
- Introduction
- Step 1: Establish foundational elements
- Step 2: Configure access and analytics
- Step 3: Understand data landscape and risks
- Step 4: Take action and investigate with Security Copilot
Lightweight guide to mitigate data leakage
Source diagram — Lightweight guide to mitigate data leakage (IMG05: original image). Full text/table diagram conversion.


Use this deployment model to enable core data security capabilities with minimal configuration, focusing on essential steps to get started quickly.
- Introduction
- Step 1: Establish foundational data security
- Step 2: Expand protection to endpoints
- Step 3: Continuous improvement
Reduce false positives by using SITs and advanced classifiers
Source diagram — Reduce false positives by using SITs and advanced classifiers (IMG06: original image). Full text/table diagram conversion.
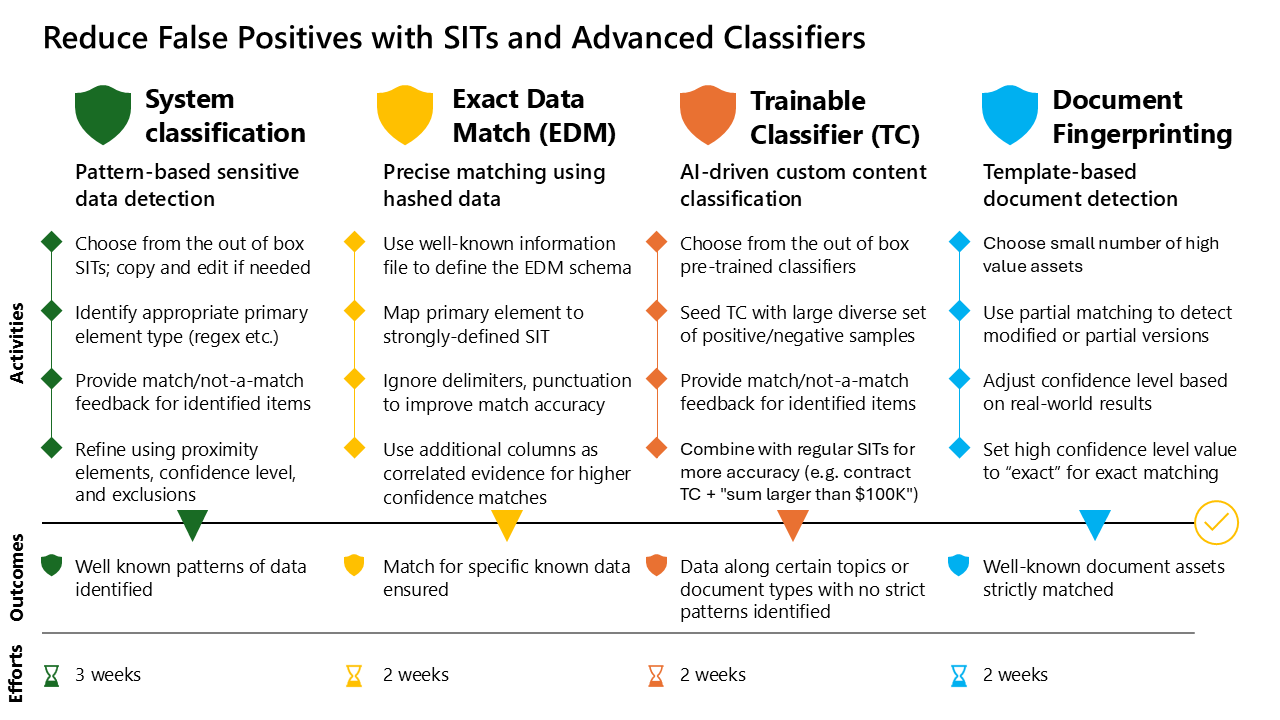

Use this deployment model to minimize false positives by effectively leveraging the classification capabilities of Microsoft Purview.
- Introduction
- Step 1: Configure pattern-based sensitive data detection
- Step 2: Implement Exact Data Match for precise matching
- Step 3: Use trainable classifiers for complex content
- Step 4: Apply document fingerprinting for templates
Additional resources
Secure by default with Microsoft Purview
Collection index · Source and completeness register
Conversion note (editorial): The source article text, examples, procedures, callouts and contextual links are retained. Section heading levels and model-navigation links are adapted for this combined Markdown file. Source claims are reproduced as published; separate editorial notes do not alter them. Diagrams are transcribed separately below.
Contents (editorial navigation)
Microsoft source · Retrieved 7 September 2026.
Introduction to 'secure by default' with Microsoft Purview
Microsoft Purview sensitivity labeling provides an efficient and robust capability to protect data. This protection is centered around encrypting your data and preventing oversharing. Use labels as conditions in other solutions such as Microsoft Purview Data Loss Prevention (DLP) and Microsoft Purview Insider Risk Management.
The traditional 'crawl-walk-run' approach is often challenging or slow to adopt due to:
- Defining the label taxonomy
- Concerns about encryption affecting users and line of business applications
- Limited adoption through manual labeling and/or only using auto-labeling to label
This guide provides an alternative deployment model focused on labeling at scale based on your protection strategy. You learn how to:
- Configure secure by default sensitivity labeling.
- Use label publishing defaults and auto-labeling in the Office client.
- Use contextual defaults in SharePoint sites to rapidly achieve deployment velocity.
When you derive Microsoft Teams and SharePoint site labeling to file labels, you can reach high labeling volumes with limited user interactions. This approach achieves a measured approach that helps overcome traditional challenges.
Tip
By securing by default by deriving labels from SharePoint sites, your organization can quickly reduce the risk associated with unintentional and intentional oversharing. Training users on how to manage exceptions, instead of when to protect, helps accelerate adoption velocity.
About this guide
This guide includes the following articles:
- Introduction (this article)
- Step 1: Start with default labeling
- Step 2: Address files with the highest sensitivity
- Step 3: Expand protection to your entire Microsoft 365 data estate
- Step 4: Operate, expand, and retroactive actions
These articles cover:
- A focus on the required solutions to only meet the goal of a model’s scenario.
- The starting point for your deployment, recommended by the engineering team.
- High level activities and deployment tips to help you plan an implementation.
- A solid foundation to grow on and augment with more scenarios.
These articles don't cover:
- A complete project plan
- A deep dive technical reference (however, this guide contains links to several articles on Microsoft Learn for additional information)
- Comprehensive guides for all solutions in Microsoft Purview
Before you begin
This guide is for administrators with knowledge of Microsoft Purview Information Protection, DLP, and Insider Risk Management. If you're new to Microsoft Purview, refer to these articles to learn more:
Licensing and subscriptions
See the Microsoft 365 guidance for security and compliance for details on the subscriptions that support the features you're deploying from this guide:
- Sensitivity Labels (auto-labeling and default library labeling in SharePoint)
- Data Loss Prevention
- Insider Risk Management (adaptive protection)
For information on licensing, see Microsoft 365, Office 365, Enterprise Mobility + Security, and Windows 11 Subscriptions for Enterprises.
Simplify your deployment strategy with the following actions
As the strategy name implies, its purpose is to secure your information by default and start training users on when to remove protection.
- Secure by default and protect information to All employees (and users within your identity ecosystem).
- Derive file labels from site (container) labels to quickly reach scale.
- Train users to update labels for sharing exceptions (instead of when to protect).
- Use auto-labeling for higher sensitivity recommendations and more restriction.
- Accelerate Data Loss Prevention deployment to restrict sharing of labeled content.
- Use Insider Risk Management to identify suspicious user labeling and sharing behaviors (intentional and unintentional).
You're in control of the protections you apply by default. For example:
- DLP policy on content with default label
- Encryption of content with default label
- Select which workload has what default label
With these options, you're empowered to start smaller, train users, and iterate through deployment milestones. An example of a measured list of deployment milestones:
- SharePoint default label set to Confidential\All employees without encryption but prevented from sharing externally by DLP. Other workloads set to General by default.
- Elevate default label to all files (client default), set email to inherit from document labels.
- Add encryption to Confidential\All employees.
Why labeling matters in protecting your content
- Protection travels with your document: Easy-to-use encryption for all users
- Simple, integrated, and consistent: Built-in Office, Acrobat Reader, Teams, Power BI, Defender for Cloud Apps, and more
- Copilot: End-to-end protection of sensitive information with Copilot interactions
- Protection beyond Microsoft 365: Protect data assets in Azure, Amazon Web Services (AWS), and more
Microsoft Purview deployment blueprint
The blueprint provides:
- a recommended label taxonomy to get your organization started
- options for users to manage exceptions, if encryption prevents them from working effectively
- help to enable your organization to augment its data security rapidly
Review and adapt this blueprint based on your existing deployment, data security objectives, and experience. To help you deploy in stages, the blueprint offers more options. You're in complete control of your deployment experience.
Note
This blueprint closely aligns with Microsoft's internal strategy. To learn more about Microsoft labeling deployment, see How we’re using sensitivity labels to make Microsoft more secure.
Source diagram — Secure by default with Microsoft Purview - Blueprint (IMG07: original image). Full text/table diagram conversion.


Next step
Step 1: Start with default labeling
Microsoft source · Retrieved 7 September 2026.
Step 1: Start with default labeling
This guide is divided into four steps:
- Introduction
- Step 1: Start with default labeling (this article)
- Step 2: Address files with the highest sensitivity
- Step 3: Expand protection to your entire Microsoft 365 data estate
- Step 4: Operate, expand, and retroactive actions
Source diagram — Secure by default with Microsoft Purview - Blueprint (IMG07: original image). Full text/table diagram conversion.
Sensitivity labels in Microsoft Purview
Sensitivity labels are organizational tags that are meaningful and intuitive to users. They're integrated and consistent across Microsoft solutions and non-Microsoft solutions such as Adobe Acrobat Reader.
Protection policies on labels vary based on the data asset. For example:
- Encryption and Dynamic Watermarking on supported file types
- Conditional Access controls and privacy for SharePoint sites and Teams
- Permission control on Azure SQL Databases, Azure Storage, and Amazon Web Services (AWS) S3
The strategy for applying labels often starts with manual labeling, then client-side auto-labeling with Sensitive Information Types (SIT), followed by service-side auto-labeling (at rest) with SIT and contextual conditions. SharePoint also offers a contextual default label per library, which this guide covers in more detail.
Start with default labels and protection at file and site level
Most customers should start with the following definition. You can adapt these recommended labels if you have an existing deployment, and iterate later with more scenarios.
At the top level, start with the following labels:
- Public: Public data is unrestricted data meant for public consumption, like publicly released source code and announced financials. Share it freely.
- General: Business data that isn't meant for public consumption, such as daily work product. Data that you can share internally and with trusted partners.
- Confidential: Sensitive business data crucial to achieving your organizational goals. Limited distribution.
- Highly confidential: Your most critical data. Share it only with named recipients.
Note
For organizations that accept personal content on managed devices, define a Non-business or Personal label at the lowest priority and without protection.
For Confidential and Highly confidential, add the following sublabels:
- \All Employees: Data can be accessed by anyone within your organization.
- \Specific People: Data can only be accessed by the specified people.
- \Internal exception: Data can be accessed by anyone internally but prevented from being shared externally. Use this label in situations where encryption is impacting daily operations.
For a complete list of parent and child labels with recommended configurations, see the following table:
| Label name | Label description for users | Settings |
|---|---|---|
| Public | Business data that is prepared and approved for public consumption. | Scope: Files and other data assets (File, Email) Content marking: No Auto-labeling: No Data Loss Prevention: None |
| General | Business data that isn't intended for public consumption. However, you can share this data with external partners, as required. | This label is selected as the default label for emails. This label is also selected for sites allowing external partners. Scope: Files and other data assets (File, Email, Meetings, Sites) Content marking: No Auto-labeling: No Site privacy: Private or Public Data Loss Prevention: Block anyone with the link |
| Confidential \ All Employees |
Confidential data that requires protection, which allows all employees full permissions. Data owners can track and revoke content. | This label is selected as the default label for documents and sites. Scope: Files and other data assets (File, Email, Meetings, Sites) Encryption: All users and groups in the org: Co-Author (note: encryption of labels can be implemented later) Content marking: Footer: Classified as Confidential Auto-labeling: No Site privacy: Private or Public Data Loss Prevention: Block anyone with the link, Block external |
| Confidential \ Specific People |
Confidential data that you can share with trusted people inside and outside your organization. These people can also reshare the data as needed. | Scope: Files and other data assets (File, Email, Meetings, Sites) Encryption: Let users assign permissions: - Encrypt-Only for Outlook - Prompt users in Word, PowerPoint, and Excel Content marking: Footer: Classified as Confidential Auto-labeling: No Site privacy: Private or Public Data Loss Prevention: Block anyone with the link |
| Confidential \ Internal exception |
Confidential data that doesn’t need to be encrypted. Use this option with care and appropriate business justification. | This label is selected for confidential information that doesn't need to be encrypted. This label can be used as an internal exception when encryption isn't supported with a process or application using this information. Leverage Data Loss Prevention and Insider Risk Management to manage risk and user deviations. Scope: Files and other data assets (File, Email, Meetings, Sites) Content marking: Footer: Classified as Confidential Auto-labeling:No Site privacy: Private or Public Data Loss Prevention: Block anyone with the link, Block external |
| Highly Confidential \ All Employees |
Highly confidential data that allows all employees view, edit, and reply permissions to this content. Data owners can track and revoke content. | This label is selected for client-side auto-labeling and service-side auto-labeling. Scope: Files and other data assets (File, Email, Meetings, Sites) Encryption: All users and groups in the org: Co-Author Content marking: Footer: Classified as Highly Confidential Auto-labeling: Automatically apply the label. Consider automatically applying for the highly sensitive All credentials sensitive information types. Site privacy: Private or Public Data Loss Prevention: Block anyone with the link, Block external |
| Highly Confidential \ Specific People |
Highly confidential data that requires protection and can be viewed only by people you specify and with the permission level you choose. | Scope: Files and other data assets (File, Email, Meetings, Sites) Encryption: Let users assign permissions: - Do Not Forward for Outlook - Prompt users in Word, PowerPoint, and Excel Content marking: Footer: Classified as Highly Confidential Auto-labeling: No Site privacy: Private or Public Data Loss Prevention: Block anyone with the link, Block external |
| Highly Confidential \ Internal exception |
Highly confidential data that doesn’t need to be encrypted. Use this option with care and appropriate business justification. | This label is selected for highly confidential information that doesn't need to be encrypted. This label can be used as an internal exception when encryption isn't supported with a process or application using this information. Leverage Data Loss Prevention and Insider Risk Management to manage risk and user deviations. Scope: Files and other data assets (File, Email, Meetings, Sites) Content marking: Footer: Classified as Confidential Auto-labeling: No Site privacy: Private or Public Data Loss Prevention: Block anyone with the link, Block external |
Secure by default
The recommended labels in this deployment model differ slightly from the traditional crawl, walk, run approach or the Default labels and policies to protect your data article:
- Set the default label to Confidential\All Employees for files. For existing files, use service-side auto-labeling with the contextual condition file extension is for all PPTX, DOCX, XLSX, and PDF files in all relevant SharePoint sites.
- Set the default label to General for emails. This label reduces deployment friction by enabling users to function normally, with the exception that confidential files attached to an email inherit the label of the file.
- Set controls for default sharing and DLP limits.
- Use auto-labeling use cases centered around Highly Confidential.
- Use the Specific People label, intuitively named and self-explanatory.
- Use Internal Exception to address edge cases where encryption prevents users from their daily work.
Highlights and recommendations
- Use intuitive names for labels.
- Avoid mixing terms such as Confidential, Restricted, or Internal together – users can find it challenging to understand the different meanings of these terms.
- Keep the list of labels to 5x5 whenever possible, that is: up to five parent labels and up to five child labels under a parent.
- Where applicable, use labels for both files and SharePoint sites.
- Use Highly Confidential most often with auto-labeling and contextual defaults. It provides more controls and restrictions.
- Use labels to set your SharePoint sites and Teams privacy to Private by default.
- For organizations that use public privacy settings extensively in SharePoint and Teams, update to Private and use company-shareable links instead.
- Private SharePoint sites with company-shareable links provide the same collaboration flexibility but reduce the risks of unintended discovery in search and Copilot.
- For more protection, set default sharing to Specific people.
- Create a chain of accountability with site owners. Use reporting and Graph API to identify deviations of use and behaviors.
- Turn on DLP on labeled content, blocking anyone with link and external where applicable. If existing shared content matches those condition blocks, DLP raises alerts and policy tips visible to users.
- Turn on email label inheritance. For more information, see Configure label inheritance from email attachments.
Turn on data security prerequisites and advanced analytics
Microsoft Purview has many capabilities. To reduce impacts to users, some capabilities aren't activated by default. Review the following settings:
- Turn on ability to process content in Office Online: Enable sensitivity labels for files in SharePoint and OneDrive
- Turn on labeling for Microsoft Teams and SharePoint Sites: Use sensitivity labels to protect collaborative workspaces (groups and sites)
- Keep the label mismatch email label. This feature sends an email to the document owner and site owner about a document that has a higher sensitivity than the site’s sensitivity label. You can confirm it's not disabled by verifying
-BlockSendLabelMismatchEmailis set to$False. - Include a help link with
-LabelMismatchEmailHelpLink.
- Keep the label mismatch email label. This feature sends an email to the document owner and site owner about a document that has a higher sensitivity than the site’s sensitivity label. You can confirm it's not disabled by verifying
- Enable support for PDF files in OneDrive and SharePoint: Enable sensitivity labels for files in SharePoint and OneDrive
- Mark files as sensitive by default: Prevent guest access to files while DLP rules are applied - SharePoint in Microsoft 365
- DLP analytics: Get started with data loss prevention analytics
- Turn on co-authoring for files with sensitivity labels: Enable co-authoring for encrypted documents
- Insider Risk Management analytics: Enable analytics in Insider Risk Management
- Turn on Insider Risk Management Indicators: Configure policy indicators in insider risk management
- Turn on Microsoft Purview audits: Get started with auditing solutions
- Enable integration with Microsoft Entra B2B: SharePoint and OneDrive integration with Microsoft Entra B2B
Company-shareable links or links for specific people
OneDrive and SharePoint sharing is configured via shareable links. To learn more, see How shareable links work in OneDrive and SharePoint in Microsoft 365.
For organizations using SharePoint sites with privacy settings set to public, move to private with default shareable links set to People in your organization. Open collaboration is available to users, but it reduces automatic content discoverability in enterprise search and Copilot.
Tip
To further reduce risks, configure Specific people as your default.
Microsoft Purview Sensitivity Labels allow you to configure the shareable links based on the SharePoint site sensitivity label. For example, this setting greatly facilitates the granular configurations between General and Confidential sites. To learn more, see Use sensitivity labels to configure the default sharing link type.
Train users on managing exceptions
When you use the secure by default approach, focus your training on the following topics:
- Making your organization aware of how important it is to secure information by default.
- The importance of labeling at SharePoint sites and how labels affect protection to files and sharing.
- How users can change labels when working with trusted external partners.
- How users can change labels when a line of business application or an add-in doesn't work correctly with encryption.
- Whether to share from OneDrive or SharePoint with trusted external partners, and how to select the appropriate site label.
- Justification required when downgrading labels.
Deriving file labeling from SharePoint site labeling reduces the number of times users must change their label. For example:
- John is sharing a file externally via OneDrive. He then reviews the content and determines that it isn't confidential and changes the label to General. John then shares externally.
- Jane is working with a partner and sharing multiple files. Jane uses SharePoint and labels the site to General. All files within the site can be shared. But if a Confidential file gets uploaded on the site, that file is protected, a notification is sent to Jane about the higher sensitivity file and she can move the file or change the label.
- Jack works in Excel with a partner using an add-in important to business operations. If this add-in is incompatible with encryption, Jack must change the label to Confidential\Internal exception.
Important
There's an important trade-off to consider between label priority, downgrade and justification, and defaults. For example, assuming General is lower priority than Confidential\All employees, and if your Office client defaults to Confidential\All employees, a SharePoint default library label set to General doesn't apply. Similarly, Confidential\Internal exception set at a higher priority doesn't require justification. Review label priorities and justification requirements.
Turn on DLP for labeled content
Microsoft Purview Data Loss Prevention (DLP) integrates with sensitivity labels, so you can quickly address DLP requirements with limited configurations.
For example, if you use the recommended labels and set the default to Confidential\All employees, include a DLP rule that blocks sharing to external users and blocks Anyone with the link. For details about each label, see the recommended label table and the DLP limits column.
To learn more about this functionality, see:
- Use sensitivity labels as conditions in DLP policies
- Data Loss Prevention policy reference
- Data loss prevention Exchange conditions and actions reference
Summary
At the end of this step, your organization has:
- Labels available for users to use manually.
- Default labeling for any new or updated documents and emails.
- User communications and training on how to manage exceptions, either when sharing or if encryption is causing challenges with their business files.
- DLP preventing the sharing of confidential files.
Next step
Step 2: Address files with the highest sensitivity
Microsoft source · Retrieved 7 September 2026.
Step 2: Address files with the highest sensitivity
This guide is divided into four steps:
- Introduction
- Step 1: Start with default labeling
- Step 2: Address files with the highest sensitivity (this article)
- Step 3: Expand protection to your entire Microsoft 365 data estate
- Step 4: Operate, expand, and retroactive actions
Source diagram — Secure by default with Microsoft Purview - Blueprint (IMG07: original image). Full text/table diagram conversion.
In the first step, you learned how to secure new and updated content. In this step, you explore how to secure your existing data, starting with the most sensitive data.
Identify your priority sites from:
- Well known sites, including sites from leadership teams
- Content Explorer with high number of sensitive documents
- Reporting
- Graph API for sites with high quantity of sensitive information
Note
If you opt to default files to Confidential\All employees, focus on sites with a higher priority label.
Manually configure priority sites default library labeling
Currently, configuration requires two separate steps:
- Add a sensitivity label to the SharePoint site.
- Define a sensitivity label as the default for files in SharePoint libraries.
Site owners can configure sensitivity labels on SharePoint sites and the default library label in libraries. SharePoint administrators can configure the site sensitivity label in the SharePoint administrator portal. Later in this article, you learn how to configure sensitivity labeling on sites and libraries by using PowerShell.
Auto-labeling for credentials and contextual conditions
Microsoft Purview provides both client-side and service-side auto-labeling.
Client-side auto-labeling provides user awareness and decision-making flexibility. When securing by default, client-side labeling is most useful for recommending higher sensitivity labeling for recipients with lower thresholds of sensitive information. Users can then decide to accept or not accept the recommendation, and report it if the label suggestion isn't appropriate.
Service-side labels apply to existing files in OneDrive and SharePoint, and in transport for emails. They provide more conditions, such as contextual conditions for:
- File type
- File size
- Document properties
In the context of the secure by default guide, secure first by site context, instead of only by sensitive information type. Therefore, you can use contextual conditions such as Set label to Confidential\All Employees on all Office/.pdf file extensions for these sites and quickly address existing priority sites. Step 3 covers more options at scale.
Important
Configure auto-labeling policies on All credentials to sensitive information because adversaries most value this information. For client-side auto-labeling, set the label to Highly Confidential\Specific People. For service-side auto-labeling, set the label to Highly Confidential\All employees.
Turn on Data Loss Prevention for content that isn't labeled
At this stage, the foundation is well in place, defaults are secure, and you started addressing existing data. Enabling Data Loss Prevention (DLP) rules for unlabeled content (use the Content is not labeled condition) on Endpoint and Exchange accelerates the labeling of content by users and prevents the sharing of unlabeled content.
Turn on this DLP rule condition for Endpoint DLP with Office/PDF file types, and for relevant restrictive actions such as upload to cloud. Users must open and label their files before uploading files on websites.
Turn on Adaptive protection and data leak behavioral rules
Insider Risk Management provides a layer of analytics and control, based on user behaviors. In the secure by default context using sensitivity labels, Insider Risk Management can identify and alert when users are downgrading labels or downloading, obfuscating, and exfiltrating that content.
Administrators are in control of the triggers and thresholds. In addition, you can now use Adaptive Protection to strengthen your DLP rules based on the user’s risk. For example, a DLP rule can audit by default when sharing files with the label General. A user identified as high risk can be prevented from sharing the same file.
Tip
Turn on and test a default policy with Adaptive Protection and iterate where applicable in your existing DLP rules.
Insider Risk Management provides many more capabilities, configurations, and controls. Review the following references and future Microsoft Purview deployment models that cover Insider Risk Management in more detail.
Summary
- Use sensitivity labels with Microsoft Teams, Groups, and SharePoint sites
- Add a sensitivity label to SharePoint document library
- Configure a default sensitivity label for a SharePoint document library
- Automatically apply a sensitivity label in Microsoft 365
Next step
Step 3: Expand protection to your entire Microsoft 365 data estate
Microsoft source · Retrieved 7 September 2026.
Step 3: Expand to your entire Microsoft 365 data estate
This guide is divided into four steps:
- Introduction
- Step 1: Start with default labeling
- Step 2: Address files with the highest sensitivity
- Step 3: Expand protection to your entire Microsoft 365 data estate (this article)
- Step 4: Operate, expand, and retroactive actions
Source diagram — Secure by default with Microsoft Purview - Blueprint (IMG07: original image). Full text/table diagram conversion.
In the previous steps, we laid the security foundation and discussed the priority sites. Both client-side and service-side auto-labeling functionalities were covered. For a comparison table, see Automatically apply a sensitivity label in Microsoft 365.
In this step, we explain options to help iteratively address all your Microsoft 365 data estate.
Previously, we recommended initial policies to familiarize users. In this step, you're ready to use them progressively in scenarios. Auto-labeling is best for scenarios where you need higher sensitivity than your default label.
We also discuss how to retroactively label existing sites and set default library labels.
Auto-label sensitive files on clients (low thresholds)
Client-side auto-labeling gives users the chance to decide whether to apply a recommended label or report a false positive. You can implement this process by using the 300+ Sensitive Information Types (SITs) and Trainable classifiers.
At a high level, follow this approach. The thresholds are examples only.
- Identify the relevant SIT for your industry.
- Recommend a label with lower SIT thresholds (1-9).
- Automatically apply a label with higher thresholds (10+) and/or Trainable classifiers.
Your client default label affects your auto-labeling strategy. While this guide recommends setting this label to Confidential\All employees, it also provides alternatives when the Office client defaults to General, and then to Confidential\All employees when saved in SharePoint.
Tip
If you set your default to Confidential\All employees, your auto-labeling strategy is less complex and focused for Highly Confidential labels.
You can progressively deploy this strategy with more SITs and trainable classifiers over time as you identify more business scenarios. By using defaults and client-side auto-labeling, you address all new and updated content.
Simulate auto-labeling sensitive files at rest
Service-side auto-labeling labels files at rest in SharePoint and OneDrive, and provides more conditions. It currently supports auto-labeling up to 100,000 files per day in your organization.
While client-side auto-labeling is limited to sensitive content, service-side auto-labeling adds support for contextual conditions such as:
- Content is shared
- File extension is
- Document name contains words or phrases
- Document property is
- Document size equals or is greater than
- Document created by
These conditions, combined with selecting specific sites and user’s OneDrive, allow your organization to prioritize which content to label first.
For example, if your organization uses templates with document properties or document name prefixes, you can run a policy across all SharePoint sites and OneDrive. You can also prioritize based on file size or documents created by your leadership teams.
You can finalize labeling all documents by using Office/PDF file extensions in batches of SharePoint sites, and set to match their respective site’s label, starting with higher sensitivity sites, progressively catching General sites.
Finally, you can implement more service-side auto-labeling for Highly Confidential content, often with higher thresholds than used in client-side auto-labeling to reduce potential false positives.
Reduce false positives with advanced classifiers
This section explains the basics of advanced classifiers and when to use them.
In the context of this secure by default blueprint, focus on the use of classifiers with auto-labeling for highly confidential content. Advanced classifiers are limited to trainable classifiers. In most cases, Sensitive Information Types (SITs) are a mix of patterns and keywords. Templates such as Protected Health Information (PHI) and Personally Identifiable Information (PII) can return many false positives as they can't determine context or can be false positives for your organization.
Microsoft Purview administrators can reduce false positives by:
- Increasing required confidence and threshold counts.
- Looking for multiple SITs with the AND operator instead of the OR operator.
- Cloning a SIT into a custom SIT and fine tuning the requirements.
- Using multiple regex expressions instead of a single but wide-ranging one.
- Forcing word matching.
- Using trainable classifiers, exact data match (EDM), and document fingerprinting.
Trainable classifiers use machine learning to identify document patterns. Microsoft Purview provides several pretrained classifiers such as legal documents, strategic business documents, and financial information. You can also create and train custom classifiers from a SharePoint document library.
By using both SITs and trainable classifiers, you can narrow down your scope – for example, contains credit cards SITs and Financial information trainable classifier.
Exact data match and document fingerprinting aren't currently available to auto-labeling but should be considered in your overall Microsoft Purview Data Loss Prevention (DLP) strategy. Similar to trainable classifiers, they can both help reduce false positives. By using EDM, you can, for example, find contains SSN out of the box SIT, and then verify against your EDM SIT to verify it's an SSN from one of your customers or employees. EDM allows you to securely store a hash of information to look for.
Document Fingerprinting operates differently than Trainable Classifiers by identifying document templates and using them in DLP policies. This method is most useful if your organization has standardized templates. You can use these templates to create precise fingerprinting.
Automate and improve Microsoft 365 protection for historical and in-use data
In the final part of this step, review options to retroactively apply labels on your existing SharePoint sites and apply default library labels accordingly.
At this point, you configured defaults throughout the environment and stopped the proliferation of unlabeled sites and documents. You started addressing labeling sites and libraries manually on priority sites and you're looking at scaling this process throughout your complete Microsoft 365 content estate.
Consider a few strategies:
- Use site owners – Communicate to site owners that they must configure a label on their site and default library. If you intend to use the second option, include mentions that it automatically receives a new default at a target date.
- Run automation scripts on remaining unlabeled sites – Use the Graph API to identify unlabeled sites and configure the container label and default library label to "Confidential\All employees."
- Optionally, prevent sharing of unlabeled files only – By using previous measures such as DLP on unlabeled content and file auto-labeling, you can choose to let sites expire naturally over scripting retroactive actions for all sites.
- Capture a timeline of unlabeled sites – If you're planning to use service-side auto-labeling for all your historical data based on container labels, capture when container labels are added and progressively add newly labeled sites in your auto-labeling policies.
Your risk posture defines how to best approach all strategies, or possibly use them progressively. While securing your data estate is important, it can be a complex task depending on its size. Start small and iterate often.
You can script sensitivity labels to SharePoint sites by using Set-PnPTenantSite and the SensitivityLabel parameter.
For the default library label, set the DefaultSensitivityLabelForLibrary parameter by using REST API on a library. A sample is provided in this article.
Summary
- Automatically apply a sensitivity label in Microsoft 365
- Minimum versions for sensitivity labels in Microsoft 365 Apps
- Manage sensitivity labels in Office apps
- Automatically apply a sensitivity label in Microsoft 365
Next step
Step 4: Operate, expand, and retroactive actions
Microsoft source · Retrieved 7 September 2026.
Step 4: Operate, expand, and retroactive actions
This guide is divided into four steps:
- Introduction
- Step 1: Start with default labeling
- Step 2: Address files with the highest sensitivity
- Step 3: Expand protection to your entire Microsoft 365 data estate
- Step 4: Operate, expand, and retroactive actions (this article)
Source diagram — Secure by default with Microsoft Purview - Blueprint (IMG07: original image). Full text/table diagram conversion.
In this final step, you implement operational procedures and expand protection beyond Microsoft 365.
Operational review of user labeling behaviors
File labeling is an integral part of this blueprint. Administrators should review risky behaviors and configurations that deviate from the standards.
Review these core operational scenarios:
- Unlabeled Sites/Teams: Use Graph API to identify sites and contact site owners or apply corrective measures.
- Mismatch between site label and default library label: Use Graph API to identify discrepancy and contact site owners or apply corrective measures.
- Leverage Data Loss Prevention (DLP) on SIT and unrestricted labels: Catch exceptions by using DLP when content is labeled without protection and sharing is attempted.
- Look for risky users with Insider Risk Management audit: Review risky users and behaviors, fine tune Insider Risk Management policies, and implement stricter Adaptive Protection.
Iterate with new labeling scenarios
This deployment model focuses on labeling scenarios that fit most organizations. You can quickly deploy it and secure your data estate rapidly without the need for identifying all edge cases.
In this section, consider potential iterations your organization should consider after a core deployment.
Secure collaboration with trusted partners or multitenanted organizations
In situations where your organization has multiple tenants or works openly with a trusted partner, consider using labels with encryption that support multiple domains such as @contoso.com + @adventureworks.com.
These labels are either or both Confidential and Highly confidential.
Tented projects
Tented projects are highly confidential. For example, merger and acquisition projects, where access to the content must be restricted to a specific group of users.
You can create a label with encryption for a security group and publish it only to the same individuals. When this project isn't required, you can unpublish the label. The information remains protected, but no new labeling is done with this label.
Full-time employees, vendors, offshore, or country/region teams
Some organizations need to identify and protect a segment of users such as:
- Full-time employees (FTE)
- Vendors
- Offshore
- Country/region
In this guide, the labeling simplifies to "All Employees" but there might be a need to secure labeling differently in some cases between FTE and vendors or partners, and sometimes for specific a country/region.
As with the previous scenario, limit the number of labels visible to users to no more than five group labels, each with no more than five labels (5x5) whenever possible. In the context of country/region labeling, target publishing to the appropriate users and use containers to file labeling to simplify defaulting to the most appropriate label.
Labeling on-premises file shares and SharePoint server
You can use sensitivity labels with your on-premises file shares and SharePoint server by using the Information Protection scanner. As this guide focuses on securing by default, configure the right defaults in SharePoint, migrate your content to SharePoint, and automatically label the content as it's uploaded.
Note
For remaining on-premises scenarios, see Learn about the Microsoft Purview Information Protection scanner.
Bring Your Own Key (BYOK) and Double Key Encryption (DKE)
Both BYOK and DKE are options to meet regulatory requirements, and they're outside of the scope of this guide. BYOK is about ownership and how the rolling of encryption keys function, while DKE is intended for a small fraction of highly sensitive content that requires more security. DKE affects several collaborative capabilities.
To learn more about BYOK, see Service encryption and key management - Microsoft Purview.
To learn more about DKE, see Double Key Encryption (DKE).
Set up accountability chain and lifecycle management
Empowering collaboration with SharePoint comes with responsibilities for site owners. Implement a chain of accountability and lifecycle management by following these recommendations:
- Two or more site owners on all sites: Use site ownership policies to identify sites without at least two owners and contact current owners or members to resolve.
- Inactive site: Use inactive site policies to remove unused sites.
- Site attestation: Require site owners to attest sites regularly.
- Review content shared with "everyone except external users": Use SharePoint Advanced Management reporting to identify content shared with everyone except guests, and contact site owners.
- Site access reviews: Use SharePoint Advanced Management, review site data governance, and initiate site access review, particularly for sites with high volume of sharing or access.
Extend protection to Azure SQL and non-Microsoft 365 storage
Sensitivity Labels can now extend protection to non-Microsoft 365 data sources. Microsoft currently supports the following data sources in public preview:
- Azure SQL Database
- Azure Blob Storage
- Azure Data Lake Storage Gen2
- Amazon S3 buckets
Microsoft Purview is a combination of what was formerly known as Azure Purview and Microsoft Purview. This experience is now all under the new Microsoft Purview portal, generally available as of July 2024. It allows data security administrators to set up labeling, auto labeling, and protection policies across both Microsoft 365 and non-Microsoft 365.
For protection policies for non-Microsoft 365 data assets, you can set up oversharing protection with "deny all except" permissions at the data level. For example, if storage accounts are inadvertently used for more sensitive content than intended, protection policies can ensure that permissions are restricted to data security admins.
Similarly, for Azure SQL Database, protection policies restrict access to a column if sensitive content is found and the column labeled. Granular configurations are available to set up who can retain access for each data asset.
Summary
- Initiate site access reviews for data access governance reports - SharePoint in Microsoft 365
- Review activities with the insider risk management audit log
- Best practices for managing your alert volume in insider risk management
- Manage site lifecycle policies - SharePoint in Microsoft 365
- Initiate site access reviews for data access governance reports - SharePoint in Microsoft 365
Next step
Return to the Secure by default with Microsoft Purview introduction, or explore other Microsoft Purview deployment models.
Full diagram conversion — secure by default
Image title: Secure by default with Microsoft Purview. Sources: IMG01 — overview thumbnail and IMG07 — full blueprint. Both show the same content and are dated May 4, 2025.
Conversion convention (editorial): The Mermaid preserves the left-to-right stage order. The tables retain all stage subtitles, activity items, outcomes and effort values. Activity numbers below are added for reference; they are not additional deployment steps. Colors, shields, diamonds, hourglasses and the final check mark distinguish stages, activities, effort and completion in the image. Decorative graphics are not reproduced.
From foundational protection to strategic operation
Scroll sideways to read the full diagram →
View diagram source
flowchart LR
F["Foundational<br/>Start with recommended labels"] --> M["Managed<br/>Address files with highest sensitivity"]
M --> O["Optimized<br/>Expand to your entire M365 data estate"]
O --> S["Strategic<br/>Operate, expand, and retroactive actions"]
| Stage | Activity | Text from image |
|---|---|---|
| Foundational | 1 | Start with default labels and protection at file and site level |
| Foundational | 2 | Turn on data security pre-requisites and adv. analytics |
| Foundational | 3 | Train users on managing exceptions |
| Foundational | 4 | Turn on DLP for labeled content |
| Managed | 1 | Manually configure priority sites default library labeling |
| Managed | 2 | Autolabeling for credentials and contextual conditions |
| Managed | 3 | Turn on DLP for content that is not labeled |
| Managed | 4 | Turn on Adaptive Protection and data leak behavioral rules |
| Optimized | 1 | Auto-label sensitive files on clients (low thresholds) |
| Optimized | 2 | Simulate auto-labeling sensitive files at rest |
| Optimized | 3 | Reduce false positives with advanced classifiers |
| Optimized | 4 | Automate and improve M365 protection to historical and in use data |
| Strategic | 1 | Operational review of user labeling behaviors |
| Strategic | 2 | Iterate with new labeling scenarios |
| Strategic | 3 | Set up accountability chain and lifecycle management |
| Strategic | 4 | Extend protection to Azure SQL and non-M365 storage |
| Stage | Outcome text | Effort text |
|---|---|---|
| Foundational | M365 new/updated content protected | 1 week |
| Managed | M365 priority content protected | 2 weeks |
| Optimized | M365 historical content protected | 2 weeks iterations |
| Strategic | Protection beyond M365 | Situational |
Image footer: Deployment guide available: https://aka.ms/PurviewDeploymentModels/SecureByDefault. Last updated: May 4, 2025.
Acronym key (editorial): M365 = Microsoft 365; DLP = Data Loss Prevention; adv. = advanced. Effort values are the image’s estimates, not guaranteed completion times.
Prevent data leak to shadow AI
Collection index · Source and completeness register
Conversion note (editorial): The source article text, examples, procedures, callouts and contextual links are retained. Section heading levels and model-navigation links are adapted for this combined Markdown file. Source claims are reproduced as published; separate editorial notes do not alter them. Diagrams are transcribed separately below.
Contents (editorial navigation)
Microsoft source · Retrieved 7 September 2026.
Prevent data leak to shadow AI
Shadow AI refers to the use of artificial intelligence (AI) tools, especially generative AI, by users without the knowledge, approval, or governance of their organization's IT or security teams. Shadow AI presents a significant challenge for organizations because unregulated use of AI tools can undermine security protocols, even when these tools enhance productivity.
If you don't address shadow AI risks, they can lead to:
- Data leak of sensitive information
- Noncompliance with regulations
- Reputational harm
By addressing these risks, organizations can ensure they adopt AI securely. Organizations need to establish clear guidelines and governance frameworks to manage the adoption of AI technologies effectively. By doing so, you can harness the benefits of AI while mitigating the associated risks.
In this deployment model, we provide a recommended approach to prevent data leak to shadow AI by using Microsoft Purview, Microsoft Defender for Cloud Apps, Microsoft Entra, and Microsoft Intune.
About this guide
This guide includes the following articles:
- Introduction (this article)
- Step 1: Discover AI apps
- Step 2: Block access to unsanctioned AI apps
- Step 3: Block sensitive data going to sanctioned AI apps
- Step 4: Govern data sent to AI apps
These articles cover:
- An overview of what shadow AI is and its risks.
- A recommended, staged approach to protect your organization from shadow AI.
- Detailed guidance for using Microsoft Defender for Cloud Apps, Microsoft Entra, Microsoft Intune, and Microsoft Purview to prevent data leakage to shadow AI.
Before you begin
This guide is for administrators with knowledge of Microsoft Purview Data Loss Prevention (DLP), Microsoft Defender for Cloud Apps, Microsoft Entra, and Microsoft Intune. If you're new to these solutions, refer to these articles to learn more:
- Learn about data loss prevention
- What is Microsoft Defender for Cloud Apps?
- What is Microsoft Entra Internet Access?
- Microsoft Intune overview
Licensing and subscriptions
See the Microsoft 365 guidance for security and compliance for details on the subscriptions that support the features you're deploying from this guide:
- Microsoft Purview Data Loss Prevention
- Microsoft Defender for Cloud Apps
- Microsoft Entra Internet Access
- Microsoft Intune
For information on licensing, see Microsoft 365, Office 365, Enterprise Mobility + Security, and Windows 11 Subscriptions for Enterprises.
Deployment overview
The deployment model breaks the approach into four steps:
| Step | Description | Outcome |
|---|---|---|
| Step 1: Discover AI apps | Discover and monitor AI app usage across your organization. | Unknown AI app usage is discovered. |
| Step 2: Block access to unsanctioned AI apps | Block organizational and user-level access to unsanctioned AI apps. | Unsanctioned AI apps are blocked. |
| Step 3: Block sensitive data going to sanctioned AI apps | Prevent sensitive data from being shared with sanctioned AI apps. | Sensitive data isn't sent to sanctioned AI apps. |
| Step 4: Govern data sent to AI apps | Govern, audit, retain, and investigate AI interactions. | Prompts sent to AI apps are retained for future investigations. |
Microsoft Purview deployment blueprint
Source diagram — Prevent data leak to shadow AI with Microsoft. (IMG02: original image). Full text/table diagram conversion.
Next step
Microsoft source · Retrieved 7 September 2026.
Step 1: Discover AI apps
This guide is divided into four steps:
- Introduction
- Step 1: Discover AI apps (this article)
- Step 2: Block access to unsanctioned AI apps
- Step 3: Block sensitive data going to sanctioned AI apps
- Step 4: Govern data sent to AI apps
Source diagram — Prevent data leak to shadow AI with Microsoft. (IMG02: original image). Full text/table diagram conversion.
The first step in preventing data leakage to shadow AI is understanding which AI apps are used across your organization, who uses them, and whether sensitive data is shared. This step focuses on discovery and monitoring before taking any blocking actions.
Discover and monitor AI app usage with Microsoft Defender for Cloud Apps
Use Microsoft Defender for Cloud Apps to discover and monitor AI app usage across your organization. Defender for Cloud Apps provides a risk assessment for each discovered app to help you determine whether to sanction or unsanction an app.
- Filter the Cloud app catalog by App category > Generative AI to identify AI apps in use.
- Review the risk score and usage details for each discovered AI app.
- Tag apps as Sanctioned or Unsanctioned based on your organization's policy.
Tip
Use the cloud discovery dashboard to identify AI app usage trends before making sanctioning decisions. Understanding the scope of AI app usage helps you prioritize which apps to address first.
Discover user interactions with Microsoft Purview DSPM for AI
Use Microsoft Purview Data Security Posture Management (DSPM) for AI reports and activity explorer to discover user interactions and understand if sensitive data is being sent to AI apps. Create the following policies to extend your insights for data discovery:
- Detect when users visit AI sites: Configure Insider Risk Management to detect when users visit AI application websites.
- Detect sensitive info shared in AI prompts in Microsoft Edge: Configure Microsoft Purview Browser Data Security to detect sensitive information shared in AI prompts within Microsoft Edge.
- Detect sensitive info pasted or uploaded to AI sites: Configure Microsoft Purview Endpoint Data Loss Prevention (DLP) to detect sensitive information pasted or uploaded to AI application websites.
To learn more, see Data security posture management for AI.
Gain visibility into risky AI interactions with Microsoft Purview Insider Risk Management
Use Microsoft Purview Insider Risk Management to gain visibility into risky AI interactions in the browser or over the network. Insider Risk Management helps identify users who may be engaging in high-risk activities involving AI tools, such as uploading sensitive content or interacting with unsanctioned AI services. To get started configuring policies, see Get started with insider risk management.
Summary
At the end of this step, your organization has:
- Visibility into which AI apps are being used across the organization.
- User interaction data flowing into DSPM for AI.
- Baseline understanding of AI-related risk through Insider Risk Management.
Next step
Step 2: Block access to unsanctioned AI apps
Microsoft source · Retrieved 7 September 2026.
Step 2: Block access to unsanctioned AI apps
This guide is divided into four steps:
- Introduction
- Step 1: Discover AI apps
- Step 2: Block access to unsanctioned AI apps (this article)
- Step 3: Block sensitive data going to sanctioned AI apps
- Step 4: Govern data sent to AI apps
Source diagram — Prevent data leak to shadow AI with Microsoft. (IMG02: original image). Full text/table diagram conversion.
After discovering AI app usage in your organization, the next step is to block access to apps that your organization didn't sanction. This step uses Microsoft Defender for Cloud Apps, Microsoft Entra, and Microsoft Intune to enforce access restrictions at the organizational, user, and device levels.
Block access for the organization with Microsoft Defender for Cloud Apps
Use Microsoft Defender for Cloud Apps to block access to unsanctioned AI apps for the entire organization. After you identify and tag AI apps as unsanctioned in Step 1, you can enforce blocking policies.
- Select the AI apps you identified as unsanctioned in the Cloud app catalog.
- Select Unsanction to mark the apps as blocked.
- Verify that the block action is propagated to your network controls.
Important
Blocking unsanctioned apps at the organizational level prevents all users from accessing these apps through managed network connections. Users can still access these apps through unmanaged devices or personal networks, which is addressed later in this step.
Restrict specific users and groups with Microsoft Entra
While Defender for Cloud Apps provides organization-wide blocking, you might need more granular control over AI app access. Use Microsoft Entra Internet Access to allow limited access to certain AI apps while restricting specific users and groups from accessing unsanctioned AI apps.
You can also combine Microsoft Entra with Microsoft Purview Insider Risk Management to block elevated-risk users from accessing AI apps. By using Adaptive Protection with Conditional Access policies, users identified as high risk by Insider Risk Management are automatically restricted from accessing AI applications.
To learn more, see:
Block installation of unsanctioned AI apps on devices with Microsoft Intune
Use Microsoft Intune to block the installation of unsanctioned AI apps on managed devices. This approach addresses the scenario where users attempt to install AI applications directly on their devices rather than accessing them through a browser.
To learn more, see Blocking and removing apps on Intune managed devices.
Summary
At the end of this step, your organization has:
- Organization-wide blocking of unsanctioned AI apps through Microsoft Defender for Cloud Apps.
- Granular user and group-level access restrictions through Microsoft Entra Internet Access.
- Elevated-risk users automatically blocked from AI app access through Adaptive Protection and Conditional Access.
- Device-level controls preventing installation of unsanctioned AI apps through Microsoft Intune.
Next step
Step 3: Block sensitive data going to sanctioned AI apps
Microsoft source · Retrieved 7 September 2026.
Step 3: Block sensitive data going to sanctioned AI apps
This guide is divided into four steps:
- Introduction
- Step 1: Discover AI apps
- Step 2: Block access to unsanctioned AI apps
- Step 3: Block sensitive data going to sanctioned AI apps (this article)
- Step 4: Govern data sent to AI apps
Source diagram — Prevent data leak to shadow AI with Microsoft. (IMG02: original image). Full text/table diagram conversion.
Even when you sanction AI apps for use in your organization, you still need to prevent sensitive data from being shared with those apps. This step focuses on using Microsoft Purview capabilities to protect sensitive information from being pasted, uploaded, or sent to sanctioned AI applications.
Label content with sensitivity labels
Use Microsoft Purview sensitivity labels to classify and protect content. Other AI apps can't decrypt content that's encrypted by Microsoft Purview, which provides a foundational layer of protection against data leakage through AI applications.
When you label content with encryption, even if a user attempts to paste or upload the content to an AI app, the AI app can't process the encrypted content. This protection makes sensitivity labeling with encryption one of the most effective protections against data leakage to shadow AI.
To learn more about deploying sensitivity labels, see the Secure by default with Microsoft Purview deployment model.
Block pasting and uploading of sensitive info with Endpoint DLP
Use Microsoft Purview Endpoint Data Loss Prevention (DLP) to block pasting and uploading of sensitive information to AI apps. Endpoint DLP monitors user activities on managed devices and can prevent sensitive data from being shared through copy/paste operations or file uploads to AI application websites.
- Create a DLP policy with Devices as the location.
- Set conditions to detect content containing sensitive information types or sensitivity labels.
- Set actions to block paste to browser, upload to cloud services, or copy to clipboard for AI application websites.
- Run in simulation mode first to understand the impact on users.
Tip
Review the DLP activity explorer to identify false positives and fine-tune your policy conditions.
Block sensitive info in AI prompts in Microsoft Edge
Use Microsoft Purview DLP or collection policies for Microsoft Edge to block sensitive information in text prompts being sent to consumer AI applications, including ChatGPT (consumer), Microsoft Copilot (consumer version), DeepSeek, and Google Gemini.
Browser Data Security in Microsoft Edge enables DLP policies to inspect text that users type or paste into AI application prompts in real time, blocking the submission of sensitive content before it leaves the browser.
To learn more, see Learn about Browser Data Security.
Detect sensitive data shared through non-Microsoft browsers and apps
Use Microsoft Purview Network Data Security policies to detect sensitive data shared with cloud apps through non-Microsoft browsers, apps, APIs, add-ins, and more. Network Data Security extends DLP protection beyond Microsoft Edge to cover all network-level traffic, helping you detect data leakage through alternative pathways.
To learn more, see Learn about Network Data Security.
Monitor and protect Microsoft 365 Copilot use with Microsoft Defender for Cloud Apps
Use Microsoft Defender for Cloud Apps to monitor and protect Microsoft 365 Copilot use by detecting and responding to suspicious interactions. Defender for Cloud Apps provides visibility into how Copilot is being used and can alert administrators to potentially risky interactions.
To learn more, see Investigate and remediate threats in Microsoft Defender for Cloud Apps.
Summary
At the end of this step, your organization has:
- Sensitivity labels applied to protect content with encryption, preventing AI apps from processing labeled data.
- Endpoint DLP policies blocking paste and upload of sensitive information to AI app websites.
- Browser Data Security policies in Microsoft Edge blocking sensitive prompts to consumer AI apps.
- Network Data Security policies detecting sensitive data shared through non-Microsoft browsers and apps.
- Defender for Cloud Apps monitoring Microsoft 365 Copilot interactions for suspicious activity.
Next step
Step 4: Govern data sent to AI apps
Microsoft source · Retrieved 7 September 2026.
Step 4: Govern data sent to AI apps
This guide is divided into four steps:
- Introduction
- Step 1: Discover AI apps
- Step 2: Block access to unsanctioned AI apps
- Step 3: Block sensitive data going to sanctioned AI apps
- Step 4: Govern data sent to AI apps (this article)
Source diagram — Prevent data leak to shadow AI with Microsoft. (IMG02: original image). Full text/table diagram conversion.
The final step focuses on governing interactions with AI apps. Even with discovery, blocking, and DLP protections in place, your organization needs to audit, retain, and investigate AI interactions to ensure ongoing compliance and respond to incidents.
Capture AI interactions with Microsoft Purview Audit
Turn on Microsoft Purview Audit to capture all AI interactions across your organization. Audit logs provide a comprehensive record of user and administrator activities involving AI apps, including prompts, responses, and related actions. To learn about auditing AI activities specifically, see Audit Copilot activity.
Note
Audit logging is typically enabled by default. Confirming it's active ensures no gap in visibility into AI interactions.
Detect inappropriate behaviors in prompts with Microsoft Purview Communication Compliance
Use Microsoft Purview Communication Compliance to detect inappropriate behaviors in AI prompts using built-in classifiers. Communication Compliance supports monitoring interactions with AI applications beyond Microsoft 365 Copilot, including third-party AI tools accessed through the browser.
Retain and delete prompts with Microsoft Purview Data Lifecycle Management
Use Microsoft Purview Data Lifecycle Management retention policies to retain and delete AI prompts based on your organization's retention requirements.
- Create a retention policy that includes AI interaction locations.
- Set the retention and deletion periods based on your organization's requirements.
Investigate AI interactions with Microsoft Purview eDiscovery
Use Microsoft Purview eDiscovery to preserve, collect, analyze, review, and export AI prompts and responses for legal and compliance investigations. eDiscovery enables you to:
- Search for specific AI interactions across your organization.
- Place holds on relevant AI interaction data to prevent deletion.
- Review and export AI prompts and responses for legal proceedings or internal investigations.
For more information, see Search for Copilot data in eDiscovery.
Block elevated-risk users from AI interactions in Microsoft Edge
As an ongoing governance measure, use Microsoft Purview Insider Risk Management with Adaptive Protection to block elevated-risk users from submitting prompts to AI apps in Microsoft Edge. This approach provides a dynamic, risk-based governance layer that adjusts protections based on user behavior.
For more information, see Help dynamically mitigate risks with Adaptive Protection.
Summary
At the end of this step, your organization has:
- Audit logging that captures all AI interactions for compliance monitoring.
- Communication Compliance policies that detect inappropriate or policy-violating AI prompts.
- Retention policies that govern the lifecycle of AI interaction data.
- eDiscovery capabilities to investigate AI interactions when needed.
- Adaptive Protection that dynamically restricts elevated-risk users from AI interactions.
Next step
Return to the Prevent data leak to shadow AI introduction, or explore other Microsoft Purview deployment models.
Full diagram conversion — shadow AI
Image title: Prevent data leak to shadow AI with Microsoft. Source: IMG02. Last updated: July 18, 2025.
Conversion convention (editorial): The four columns are reproduced in order. The activity table retains the superscript ownership markers, including the mixed-product activity in Block access. Secure data and Govern data have a product marker on their column headings that applies to the whole column. No effort estimate appears in this image.
| Superscript marker | Product key printed in image |
|---|---|
| 1 | Defender for Cloud Apps |
| 2 | Entra |
| 3 | Intune |
| 4 | Purview |
Discover, restrict, protect and govern AI use
Scroll sideways to read the full diagram →
View diagram source
flowchart LR
D["Discover<br/>Discover AI apps"] --> B["Block access<br/>Block user access to unsanctioned AI apps"]
B --> S["Secure data · Purview<br/>Block sensitive data going to sanctioned AI apps"]
S --> G["Govern data · Purview<br/>Govern data sent to AI app in Microsoft Edge"]
| Column | Activity text | Product marker(s) |
|---|---|---|
| Discover | Discover the use of AI apps | 1 |
| Discover | Discover user interactions with AI apps | 4 |
| Block access | Block access to unsanctioned AI app for the org | 1 |
| Block access | Allow limited access to certain AI apps, and restrict specific users and groups from access or block elevated risk user from access | Limited app access: 1; specific users/groups: 2; elevated-risk user: 2, 4 |
| Block access | Block install of the AI app on devices | 3 |
| Secure data | Block pasting and uploading of sensitive info | 4, inherited from column heading |
| Secure data | Block elevated risk users from submitting prompts in Microsoft Edge | 4, inherited from column heading |
| Secure data | Block sensitive info from being sent in Microsoft Edge | 4, inherited from column heading |
| Secure data | Block sensitive data shared through network service providers | 4, inherited from column heading |
| Govern data | Audit interactions | 4, inherited from column heading |
| Govern data | Detect inappropriate behaviors in prompts | 4, inherited from column heading |
| Govern data | Retain/delete prompts | 4, inherited from column heading |
| Govern data | Investigate prompts | 4, inherited from column heading |
| Column | Outcome text from image |
|---|---|
| Discover | Unknown AI app usage is discovered |
| Block access | Unsanctioned AI apps are blocked |
| Secure data | Sensitive data is not sent to sanctioned AI apps |
| Govern data | Prompts sent to AI apps in Microsoft Edge is retained for future investigations |
Visual relationships (editorial): Connected diamonds group activities within a column; the horizontal outcome line and completion check mark present the progression. They do not describe packet routing. The source’s grammar and absolute outcome statements are retained. Differences between this image and the step pages are recorded in editorial notes.
Secure and govern Microsoft 365 Copilot agents
Collection index · Source and completeness register
Conversion note (editorial): The source article text, examples, procedures, callouts and contextual links are retained. Section heading levels and model-navigation links are adapted for this combined Markdown file. Source claims are reproduced as published; separate editorial notes do not alter them. Diagrams are transcribed separately below.
Contents (editorial navigation)
Microsoft source · Retrieved 7 September 2026.
Secure and govern Microsoft 365 Copilot agents
Agents in Microsoft 365 bring specialized skills and knowledge into Microsoft 365 Copilot. These agents are embedded directly in Microsoft 365 Copilot Chat and the Microsoft 365 apps you use every day. These out-of-the-box agents take on unique roles to work alongside you and your team. This collaboration makes your work easier, keeps teams aligned, and helps accelerate decision-making to unlock faster business value.
Agents in Microsoft 365 Copilot leverage information in SharePoint and Microsoft Dataverse, which raises concerns for organizations about oversharing, data loss, and insider risks. If grounding data and agent interactions aren't secured, it could lead to:
- Access to information beyond what the user needs for their role
- Unauthorized disclosure of confidential information
- Out-of-date or irrelevant responses
By addressing these risks, organizations can ensure that agents are secured end to end.
In this deployment model, you find a recommended approach to secure agents in Microsoft 365 by using Microsoft Purview, from grounding data to interactions.
About this guide
This guide includes the following articles:
- Introduction (this article)
- Step 1: Discover risks and identify gaps
- Step 2: Protect sensitive info in grounding data
- Step 3: Protect interactions
- Step 4: Govern interactions
These articles cover:
- A problem summary of why you need to secure agents in Microsoft 365.
- A recommended, staged approach to secure agents in Microsoft 365.
- Detailed guidance for using Microsoft Purview features to secure agents in Microsoft 365, from grounding data to interactions.
Before you begin
This guide is for administrators with knowledge of Microsoft Purview Information Protection, Data Loss Prevention (DLP), Insider Risk Management, Data Lifecycle Management, and Compliance Manager. If you're new to these solutions, refer to these articles to learn more:
- Learn about sensitivity labels
- Learn about data loss prevention
- Learn about insider risk management
- Learn about data lifecycle management
- Microsoft Purview Compliance Manager
- Data security and compliance protections for generative AI apps
Licensing and subscriptions
See the Microsoft 365 guidance for security and compliance for details on the subscriptions that support the features you're deploying from this guide:
- Microsoft Purview Information Protection
- Microsoft Purview Data Loss Prevention
- Microsoft Purview Insider Risk Management
- Microsoft Purview Data Lifecycle Management
- Microsoft Purview Communication Compliance
- Microsoft Purview eDiscovery
- Microsoft Purview Compliance Manager
For information on licensing, see Microsoft 365, Office 365, Enterprise Mobility + Security, and Windows 11 Subscriptions for Enterprises.
Deployment overview
The deployment model breaks the approach into four steps:
| Step | Description | Outcome |
|---|---|---|
| Step 1: Discover risks and identify gaps | Turn on auditing, discover oversharing risks, and identify gaps in AI regulations. | Potential gaps in data security are discovered. |
| Step 2: Protect sensitive info in grounding data | Apply sensitivity labels, reduce stale data, and restrict sensitive files from Copilot processing. | Sensitive info in grounding data isn't used as a knowledge source. |
| Step 3: Protect interactions | Enforce label inheritance in conversations and detect risky AI interactions. | Interactions are protected from data loss and insider risk. |
| Step 4: Govern interactions | Retain, investigate, and govern AI interaction data. | Interactions with agents are retained for future investigations. |
Microsoft Purview deployment blueprint
Source diagram — The image shows the deployment model to secure and govern Microsoft 365 Copilot agents with Microsoft Purview in four steps. (IMG03: original image). Full text/table diagram conversion.
Next step
Step 1: Discover risks and identify gaps
Microsoft source · Retrieved 7 September 2026.
Step 1: Discover risks and identify gaps
This guide is divided into four steps:
- Introduction
- Step 1: Discover risks and identify gaps (this article)
- Step 2: Protect sensitive info in grounding data
- Step 3: Protect interactions
- Step 4: Govern interactions
Source diagram — Secure and govern Microsoft 365 Copilot agents deployment blueprint. (IMG03: original image). Full text/table diagram conversion.
Before securing and governing Microsoft 365 Copilot agents, first understand your current risk posture. This step focuses on turning on auditing, discovering oversharing risks, identifying where sensitive information resides, and understanding gaps in regulatory compliance.
Turn on Microsoft Purview Audit
Turn on Microsoft Purview Audit to log all activity related to grounding data and AI app and agent interactions. Audit logs provide the foundation for visibility into how agents access and use organizational data.
- Verify that auditing is enabled. If it's not, select Start recording user and admin activity.
- Wait up to 60 minutes for auditing to activate.
Note
Audit logging is typically enabled by default. Confirming it's active ensures no gap in visibility into agent interactions.
To learn more, see Get started with auditing solutions.
Discover oversharing risks with Microsoft Purview data risk assessments
Discover potential oversharing in SharePoint and OneDrive with Microsoft Purview data risk assessments. Data risk assessments help you identify content that might be overshared and accessible to Microsoft 365 Copilot agents, so you can take corrective action before deploying agents broadly.
To learn more, see Data Security Posture Management (DSPM) for AI.
Discover sensitive info in Microsoft Dataverse with Unified Catalog
Use Microsoft Purview Data Governance's Unified Catalog to discover where sensitive information resides in Microsoft Dataverse. Since agents can use Dataverse as a knowledge source, understanding what sensitive data exists in Dataverse is critical to preventing unintended data exposure through agent responses.
To learn more, see Connect to and manage Microsoft Dataverse in Microsoft Purview.
Discover risky AI activities with Microsoft Purview DSPM for AI
Use Microsoft Purview Data Security Posture Management (DSPM) for AI's Apps and Agents report to discover risky AI activities across your organization. This report provides visibility into how AI apps and agents are used, including potentially risky interactions.
To learn more, see Data Security Posture Management (DSPM) for AI.
Identify and address gaps in meeting AI regulations with Microsoft Purview Compliance Manager
Use Microsoft Purview Compliance Manager to identify and address gaps in meeting AI regulations. Compliance Manager provides assessments and recommended improvement actions to help your organization meet regulatory requirements related to AI governance.
To learn more, see Microsoft Purview Compliance Manager.
Summary
At the end of this step, your organization has:
- Enabled audit logging to capture all agent interactions with grounding data.
- Gained visibility into oversharing risks in SharePoint and OneDrive through data risk assessments.
- Developed an understanding of where sensitive information resides in Microsoft Dataverse.
- Obtained insight into risky AI activities through DSPM for AI reports.
- Identified gaps in AI regulatory compliance through Compliance Manager.
Next step
Step 2: Protect sensitive info in grounding data
Microsoft source · Retrieved 7 September 2026.
Step 2: Protect sensitive info in grounding data
This guide is divided into four steps:
- Introduction
- Step 1: Discover risks and identify gaps
- Step 2: Protect sensitive info in grounding data (this article)
- Step 3: Protect interactions
- Step 4: Govern interactions
Source diagram — Secure and govern Microsoft 365 Copilot agents deployment blueprint. (IMG03: original image). Full text/table diagram conversion.
After discovering risks in Step 1, the next step focuses on protecting the grounding data that Microsoft 365 Copilot agents use as knowledge sources. This step includes applying sensitivity labels, managing stale data, and restricting sensitive files from being processed by agents.
Apply sensitivity labels to SharePoint and Microsoft Dataverse
Apply sensitivity labels to content in SharePoint and Microsoft Dataverse to classify and protect grounding data. Sensitivity labels travel with the content and Microsoft 365 Copilot agents respect them, ensuring that agents don't surface sensitive information to unauthorized users.
When a user interacts with a Copilot agent, the conversation displays the most restrictive sensitivity label from the references used to formulate a response. Responses include only content from references where the user has appropriate permissions.
To learn more about deploying sensitivity labels, see:
- Create and configure sensitivity labels
- Enable sensitivity labels for SharePoint and OneDrive
- Secure by default with Microsoft Purview deployment model
Reduce stale data to improve agent response accuracy with Microsoft Purview Data Lifecycle Management
Use Microsoft Purview Data Lifecycle Management to reduce stale data and improve agent response accuracy. Retention policies help ensure that outdated or irrelevant content is removed from SharePoint and OneDrive, reducing the likelihood of agents surfacing inaccurate or outdated information in responses.
- Create a retention policy targeting SharePoint sites and OneDrive accounts that serve as agent knowledge sources.
- Set retention and deletion periods based on your organization's data freshness requirements.
Restrict sensitive files from Microsoft 365 Copilot processing with Microsoft Purview DLP
Use Microsoft Purview Data Loss Prevention (DLP) for Microsoft 365 Copilot to restrict sensitive files from being processed by Copilot agents. For detailed steps on creating DLP policies, see Create and deploy DLP policies. To learn about DLP for Copilot, see Learn about DLP for Microsoft 365 Copilot.
- Create a custom DLP policy with Microsoft 365 Copilot as the location.
- Set conditions to detect content labeled with specific sensitivity labels (for example, Highly Confidential).
- Set the action to restrict Copilot from processing the file.
- Run in simulation mode first to understand the impact on agent responses.
Tip
Review the DLP activity explorer to identify which files are restricted before enforcing the policy.
Implement Data policies for Microsoft Dataverse
Implement Data policies for Microsoft Dataverse to restrict sensitive data from being used as a knowledge source for agents. Data policies provide controls over which Dataverse content agents can access and include in their responses.
To learn more, see Learn about DLP for Microsoft 365 Copilot.
Implement oversharing DLP policy for SharePoint and OneDrive
Implement an oversharing DLP policy for SharePoint and OneDrive to detect "anyone" sharing links for labeled and unlabeled data. This policy helps ensure that broadly shared content isn't inadvertently surfaced through agent responses to users who shouldn't have access.
For more information, see Data Loss Prevention policy reference.
Summary
At the end of this step, your organization has:
- Sensitivity labels applied to grounding data in SharePoint and Microsoft Dataverse.
- Retention policies reducing stale data to improve agent response accuracy.
- DLP policies restricting highly sensitive files from Microsoft 365 Copilot processing.
- Data policies for Microsoft Dataverse controlling agent access to sensitive data.
- Oversharing DLP policies detecting broadly shared content in SharePoint and OneDrive.
Next step
Microsoft source · Retrieved 7 September 2026.
Step 3: Protect interactions
This guide is divided into four steps:
- Introduction
- Step 1: Discover risks and identify gaps
- Step 2: Protect sensitive info in grounding data
- Step 3: Protect interactions (this article)
- Step 4: Govern interactions
Source diagram — Secure and govern Microsoft 365 Copilot agents deployment blueprint. (IMG03: original image). Full text/table diagram conversion.
After protecting grounding data in Step 2, focus on protecting the interactions themselves. Microsoft Purview provides capabilities to enforce sensitivity label inheritance in agent conversations, restrict processing of sensitive files referenced in interactions, and detect risky AI interactions.
Use automatic sensitivity label inheritance from SharePoint and Microsoft Dataverse
Microsoft 365 Copilot conversations automatically display and respect sensitivity labels applied to data in SharePoint and Microsoft Dataverse. When a user interacts with a Copilot agent, the conversation inherits the most restrictive sensitivity label from the referenced content.
Verify that automatic label inheritance is working correctly:
- Verify that sensitivity labels are applied to content in SharePoint sites and Microsoft Dataverse that serve as agent knowledge sources.
- Open a Microsoft 365 Copilot conversation that references labeled content.
- Confirm that the conversation displays the most restrictive sensitivity label from the referenced sources.
This automatic label inheritance ensures that:
- A sensitivity label is displayed for the entire conversation.
- Users are aware of the sensitivity level of the information they're working with.
- Protection policies associated with the label are enforced on the conversation.
Restrict Microsoft 365 Copilot from processing sensitive files referenced in interactions
Use Microsoft Purview Data Loss Prevention (DLP) for Microsoft 365 Copilot to restrict Copilot from processing sensitive files referenced in interactions. This restriction ensures that sensitive prompts aren't used for web queries and that highly sensitive content isn't included in agent responses, even when a user has access to the file.
Important
DLP for Microsoft 365 Copilot provides a critical layer of protection by ensuring that even if sensitive files are accessible, the system doesn't process them or include them in agent responses when they match your DLP policy conditions.
For more information, see Learn about DLP for Microsoft 365 Copilot.
Detect risky AI interactions with Microsoft Purview Insider Risk Management
Use Microsoft Purview Insider Risk Management's Risky AI usage policy template to detect risky AI interactions across your organization. This policy identifies users who engage in potentially suspicious interactions with AI agents, such as attempts to access sensitive content or exfiltrate data through prompts.
- Create an Insider Risk Management policy using the Risky AI usage template.
- Configure the policy scope, triggers, and thresholds based on your organization's risk tolerance.
- Turn on the policy.
Summary
At the end of this step, your organization has:
- Automatic sensitivity label inheritance in Microsoft 365 Copilot conversations.
- DLP policies restricting Copilot from processing sensitive files referenced in interactions.
- Insider Risk Management policies detecting risky AI interactions.
Next step
Microsoft source · Retrieved 7 September 2026.
Step 4: Govern interactions
This guide is divided into four steps:
- Introduction
- Step 1: Discover risks and identify gaps
- Step 2: Protect sensitive info in grounding data
- Step 3: Protect interactions
- Step 4: Govern interactions (this article)
Source diagram — Secure and govern Microsoft 365 Copilot agents deployment blueprint. (IMG03: original image). Full text/table diagram conversion.
The final step focuses on governing interactions with Microsoft 365 Copilot agents. After you put discovery, protection, and interaction-level controls in place, your organization needs to retain, investigate, and govern agent interaction data to ensure ongoing compliance and respond to incidents.
Retain and delete interactions with Microsoft Purview Data Lifecycle Management
Use Microsoft Purview Data Lifecycle Management retention policies to retain interactions for future investigations and delete interactions based on retention requirements. Create retention policies to ensure agent interaction data is preserved when needed and removed when no longer required.
- Create a retention policy that includes Microsoft 365 Copilot interaction locations.
- Set retention and deletion periods based on your organization's compliance requirements.
Detect inappropriate behaviors with Microsoft Purview Communication Compliance
Use Microsoft Purview Communication Compliance policies with built-in classifiers to detect inappropriate behaviors in agent interactions, including jailbreak attempts, harassment, inappropriate images, and other policy-violating content.
Investigate legal and internal cases with Microsoft Purview eDiscovery
Use Microsoft Purview eDiscovery to preserve, collect, analyze, review, and export agent interactions for legal and internal investigations.
Investigate interactions and grounding data with Microsoft Purview Data Security Investigations
Use Microsoft Purview Data Security Investigations to investigate interactions and grounding data by leveraging the power of AI. DSI provides advanced investigation capabilities that help you understand the full context of security incidents involving agent interactions.
To learn more, see Learn about data security investigations.
Identify and address gaps in meeting AI regulations with Microsoft Purview Compliance Manager
Use Microsoft Purview Compliance Manager to identify and address gaps in meeting AI regulations on an ongoing basis. As regulatory requirements evolve, Compliance Manager helps ensure your organization stays current with AI governance obligations.
To learn more, see Microsoft Purview Compliance Manager.
Summary
At the end of this step, your organization has:
- Retention policies governing the lifecycle of Microsoft 365 Copilot agent interaction data.
- Communication Compliance policies detecting inappropriate behaviors in agent interactions.
- eDiscovery capabilities to investigate agent interactions when needed.
- Data Security Investigations providing AI-powered investigation of interactions and grounding data.
- Ongoing compliance monitoring through Compliance Manager for AI regulations.
Next step
Return to the Secure and govern Microsoft 365 Copilot agents introduction, or explore other Microsoft Purview deployment models.
Full diagram conversion — Copilot agents
Image title: Secure agents in Microsoft 365 with Microsoft Purview. Source: IMG03. Last updated: August 26, 2025.
Conversion convention (editorial): The stage diagram preserves the four-column order; the tables transcribe each activity and outcome without replacing the source’s outcome language with an interpretation. No effort estimate is present.
Protect Copilot agents from grounding to interactions
Scroll sideways to read the full diagram →
View diagram source
flowchart LR
D["Discover<br/>Discover risks and identify gaps"] --> P["Protect grounding data<br/>Protect sensitive info in grounding data"]
P --> I["Protect interactions<br/>Protect interactions against data loss and insider risks"]
I --> G["Govern<br/>Govern interactions"]
| Column | Activity text from image |
|---|---|
| Discover | Turn on Purview Audit |
| Discover | Discover SPO oversharing risks with Data risk assessment |
| Discover | Discover sensitive info in Dataverse with Unified catalog |
| Discover | Discover risky AI activities with DSPM for AI Apps and Agents report |
| Protect grounding data | Apply sensitivity label to SharePoint and Dataverse |
| Protect grounding data | Reduce stale data to improve response accuracy with DLM |
| Protect grounding data | Restrict files from Copilot processing with DLP for Copilot |
| Protect grounding data | Implement DLP policies for SPO and Data policies for Dataverse |
| Protect interactions | Automatic sensitivity label inheritance from SharePoint and Dataverse |
| Protect interactions | Restrict Copilot from processing sensitive files referenced in interactions with DLP for Copilot |
| Protect interactions | Detect Risky AI interactions with IRM Risky AI policy |
| Govern | Retain/delete interactions with DLM policies |
| Govern | Detect inappropriate behaviors with CC policies |
| Govern | Investigate cases with eDiscovery |
| Govern | Investigate grounding data and interactions with DSI |
| Govern | Identify & address gaps in meeting AI regulations with CM |
| Column | Outcome text from image |
|---|---|
| Discover | Potential gaps in data security is discovered |
| Protect grounding data | Sensitive info in grounding data is not used as knowledge source |
| Protect interactions | Interactions are protected from data loss and insider risk |
| Govern | Interactions with agents is retained for future investigations |
| Acronym in image | Expansion (editorial) |
|---|---|
| SPO | SharePoint Online |
| DSPM | Data Security Posture Management |
| DLM | Data Lifecycle Management |
| DLP | Data Loss Prevention |
| IRM | Insider Risk Management |
| CC | Communication Compliance |
| DSI | Data Security Investigations |
| CM | Compliance Manager |
Visual relationships (editorial): Connected diamonds group the activities within each stage. The horizontal outcome line and final check mark indicate the staged deployment. The image’s outcome claims and the implementation limitations are kept separate; see editorial notes.
Deploy and use Data Security Posture Management
Collection index · Source and completeness register
Conversion note (editorial): The source article text, examples, procedures, callouts and contextual links are retained. Section heading levels and model-navigation links are adapted for this combined Markdown file. Source claims are reproduced as published; separate editorial notes do not alter them. Diagrams are transcribed separately below.
Contents (editorial navigation)
Microsoft source · Retrieved 7 September 2026.
Deploy and use Data Security Posture Management
Microsoft Purview Data Security Posture Management (DSPM) provides a centralized view of your organization's data security posture. DSPM helps you understand your data landscape, identify risks, and take action by providing analytics reports, trends, and actionable recommendations for creating Data Loss Prevention (DLP) and Insider Risk Management policies.
DSPM brings together insights from multiple Microsoft Purview solutions to provide:
- Trends and analytics reports to track and understand activities around sensitive data and users
- Recommendations that transform raw data discovery into actionable security measures
- Microsoft Security Copilot-based investigation for deeper insights through suggested prompts, open prompt investigation, and Promptbooks
In this deployment model, you receive step-by-step guidance to deploy and use DSPM, from establishing foundational elements through taking action on recommendations.
About this guide
This guide includes the following articles:
- Introduction (this article)
- Step 1: Establish foundational elements
- Step 2: Configure access and analytics
- Step 3: Understand data landscape and risks
- Step 4: Take action and investigate with Security Copilot
These articles cover:
- Recommended foundational elements to have in place before using DSPM.
- Initial access and configuration for DSPM analytics.
- How to use DSPM reports, trends, and recommendations to understand your data landscape.
- How to create policies and investigate risks using DSPM recommendations and Security Copilot.
Before you begin
This guide is for administrators with knowledge of Microsoft Purview Data Loss Prevention (DLP), Insider Risk Management, and Information Protection. If you're new to these solutions, refer to these articles to learn more:
- Learn about data loss prevention
- Learn about insider risk management
- Learn about sensitivity labels
- Learn about Data Security Posture Management
Licensing and subscriptions
See the Microsoft 365 guidance for security & compliance for details on the subscriptions that support the features you're deploying from this guide:
- Microsoft Purview Data Loss Prevention
- Microsoft Purview Insider Risk Management
- Microsoft Purview Information Protection
- Microsoft Security Copilot (optional, for investigation capabilities)
For information on licensing, see Microsoft 365, Office 365, Enterprise Mobility + Security, and Windows 11 Subscriptions for Enterprises.
Deployment overview
The deployment model breaks the approach into four steps:
| Step | Description | Outcome |
|---|---|---|
| Step 1: Establish foundational elements | Identify sensitive information types (SITs), configure labeling, define Insider Risk Management program, and enable Microsoft Security Copilot. | Full data estate is understood and accessible. |
| Step 2: Configure access and analytics | Assign roles, enable DLP and Insider Risk Management analytics, and start the initial scan. | DSPM starts pulling insights. |
| Step 3: Understand data landscape and risks | Review DSPM reports, trends, and recommendations. | Risks are assessed and data security posture is understood. |
| Step 4: Take action and investigate with Security Copilot | Create policies from recommendations and investigate with Security Copilot. | Actions taken to secure the environment. |
Note
After completing Step 4, plan a monthly iteration cycle to review DSPM recommendations, update policies, and strengthen your overall data security posture.
Microsoft Purview deployment blueprint
Source diagram — The image shows the deployment model to deploy and use Microsoft Purview Data Security Posture Management (DSPM) in four steps. (IMG04: original image). Full text/table diagram conversion.
Next step
Step 1: Establish foundational elements
Microsoft source · Retrieved 7 September 2026.
Step 1: Establish foundational elements
This guide is divided into four steps:
- Introduction
- Step 1: Establish foundational elements (this article)
- Step 2: Configure access and analytics
- Step 3: Understand data landscape and risks
- Step 4: Take action and investigate with Security Copilot
Source diagram — Deploy and use Microsoft Purview Data Security Posture Management (DSPM) deployment blueprint. (IMG04: original image). Full text/table diagram conversion.
Before configuring Microsoft Purview Data Security Posture Management (DSPM), you need foundational elements in place. These elements ensure that when you review recommendations and perform analysis, DSPM has the context it needs to provide actionable insights.
Identify built-in and custom sensitive information types
Identify the built-in and custom sensitive information types (SITs) that are relevant to your organization. This step ensures that when you review DSPM recommendations and perform analysis, you're aware of what needs to be prioritized.
Built-in SITs are a good starting point for organizational requirements and can be improved after investigation. If the built-in SITs don't fully address your organization's needs, create custom SITs to detect data unique to your business, such as internal project codes, employee IDs, or proprietary information.
To learn more, see Learn about sensitive information types.
Configure a labeling schema
Configure a sensitivity labeling schema for your organization. While labeling isn't required for DSPM, it's extremely helpful for identifying how files should be handled and for setting up Data Loss Prevention (DLP) policies later. A configured labeling schema also helps improve DSPM recommendations and provides better insights in DSPM reports.
Tip
If you haven't deployed sensitivity labels yet, see the Secure by default with Microsoft Purview deployment model for a recommended approach to labeling at scale.
To learn more, see Learn about sensitivity labels.
Define an Insider Risk Management program
Define your organization's Insider Risk Management program. Insider Risk Management enables organizations to proactively address insider threats and ensures compliance with regulations. When combined with DLP and Adaptive Protection, DSPM provides a stronger data security landscape.
With an Insider Risk Management program defined, DSPM can surface insights about potentially risky users and their activities, providing recommendations for Insider Risk Management policies alongside DLP recommendations.
To learn more, see Learn about insider risk management and Get started with insider risk management.
Enable Microsoft Security Copilot (optional)
Enable Microsoft Security Copilot to unlock advanced investigation capabilities within DSPM. Security Copilot is optional but enables:
- Custom investigations using natural language prompts
- DSPM Promptbooks for guided investigation workflows
- AI-powered analysis to understand the role of AI in making investigations more efficient
Note
If you enable Security Copilot, you need the Data Security Viewer role to use Security Copilot within DSPM.
To learn more, see Data Security Posture Management with Security Copilot.
Summary
At the end of this step, your organization has:
- Identified built-in and custom SITs for your organization's data classification needs.
- Configured a labeling schema to improve DSPM recommendations and insights.
- Defined an Insider Risk Management program to enable risk-based insights.
- Enabled Security Copilot (optional) for advanced investigation capabilities.
Next step
Step 2: Configure access and analytics
Microsoft source · Retrieved 7 September 2026.
Step 2: Configure access and analytics
This guide is divided into four steps:
- Introduction
- Step 1: Establish foundational elements
- Step 2: Configure access and analytics (this article)
- Step 3: Understand data landscape and risks
- Step 4: Take action and investigate with Security Copilot
Source diagram — Deploy and use Microsoft Purview Data Security Posture Management (DSPM) deployment blueprint. (IMG04: original image). Full text/table diagram conversion.
With the foundational elements in place from Step 1, this step focuses on configuring access to Data Security Posture Management (DSPM) and enabling the analytics that power its insights.
Assign a role with least privilege
Assign users to one of the following roles or role groups to provide access to DSPM. Use roles with the fewest permissions to enhance your organization's security posture.
| Role or role group | Description |
|---|---|
| Data Security Management role group | Provides full access to DSPM management capabilities. |
| Data Security Viewer role | Required to use Microsoft Security Copilot in DSPM. |
| Insider Risk Management Admins role | Provides access to Insider Risk Management-related DSPM capabilities. |
| Microsoft Entra ID Global Administrator role | Provides full access (use sparingly). |
| Microsoft Entra Compliance Administrator role | Provides compliance-focused access to DSPM. |
Important
Use roles with the fewest permissions. Reducing the number of users with the Global Administrator role enhances security for your organization.
To learn more, see Permissions in Microsoft Purview.
Enable Data Loss Prevention and Insider Risk Management analytics
Enable Data Loss Prevention (DLP) and Insider Risk Management analytics to power DSPM insights. DSPM processes and correlates data states, signals, and user activities based on the configuration of other data security and compliance solutions in Microsoft Purview.
There are two ways to enable analytics:
- Opt in to DSPM: Enables both DLP and Insider Risk Management analytics together.
- Enable individually: Enable DLP analytics and Insider Risk Management analytics separately.
- Opt in to DSPM analytics, or enable DLP and Insider Risk Management analytics individually.
- Verify the analytics are enabled in each solution's settings page.
Verify the initial scan starts
After you enable analytics, the initial scan starts automatically. DSPM scans your organization's data and activities, offering baseline insights and recommendations. To learn more, see Learn about Data Security Posture Management.
Note
The initial scan can take up to three days to complete.
Summary
At the end of this step, your organization has:
- Assigned appropriate roles with least privilege for DSPM access.
- Enabled DLP and Insider Risk Management analytics to power DSPM insights.
- Started the initial DSPM scan and is processing organizational data.
Next step
Step 3: Understand data landscape and risks
Microsoft source · Retrieved 7 September 2026.
Step 3: Understand data landscape and risks
This guide is divided into four steps:
- Introduction
- Step 1: Establish foundational elements
- Step 2: Configure access and analytics
- Step 3: Understand data landscape and risks (this article)
- Step 4: Take action and investigate with Security Copilot
Source diagram — Deploy and use Microsoft Purview Data Security Posture Management (DSPM) deployment blueprint. (IMG04: original image). Full text/table diagram conversion.
After the initial Data Security Posture Management (DSPM) scan finishes, you can start reviewing insights to understand your data landscape and identify risks. This step covers the three main areas of DSPM: reports, trends, and recommendations.
Review DSPM analytics reports
Use DSPM analytics reports to understand where sensitive data exists and how users interact with it. Each report provides options for filtering, reviewing, evaluating, and exporting insights.
DSPM analytics reports focus on two main areas:
- Unprotected sensitive assets across data sources: This report is similar to content explorer but covers the entire data estate. It provides insights on what isn't protected by Data Loss Prevention (DLP) and/or what isn't labeled with access control. The report shows the location of the files and their associated classifiers.
- Users performing top risk-related activities on unprotected sensitive assets: This report is associated with Insider Risk Management and flags based on Insider Risk Management identifiers such as departing users and high-risk users. It also includes activities based on classifiers not included in DLP.
- Select Reports to view the analytics reports.
- Review the Unprotected sensitive assets report to identify gaps in data protection.
- Review the Users performing top risk-related activities report to identify high-risk user behaviors.
Monitor DSPM trends
Use DSPM trends on the Overview page to track and understand historical activity around sensitive data and users. Trends highlight changes over time and help you measure the effectiveness of your data security posture.
DSPM tracks the following trends:
- Sensitive assets labeled (automatically and manually): The percentage of assets per week that had sensitivity labels applied.
- Sensitive assets protected by at least one DLP policy: The percentage of sensitive assets in your organization protected by one or more DLP policies.
- Potentially risky users: The number of users per week who were assigned insider risk severity levels (low, medium, high).
To learn more, see Learn about Data Security Posture Management.
Review DSPM recommendations
Use DSPM recommendations to understand your current risk posture and determine next steps. Recommendations are generated from the processed data, current state of unprotected sensitive assets, and user activities that put these assets at risk.
DSPM recommendations:
- Enable organizations to act quickly by creating DLP and Insider Risk Management policies that mitigate data security risks.
- Identify gaps in existing DLP and Insider Risk Management policies.
- Automatically update, including removing recommendations older than 30 days.
Tip
Review DSPM recommendations at least every 30 days to understand current risk and determine next steps. Recommendations are refreshed regularly and reflect the latest state of your data estate.
To learn more, see Learn about Data Security Posture Management.
Summary
At the end of this step, your organization has:
- Reviewed analytics reports to understand unprotected sensitive assets and risky user activities.
- Monitored trends to track changes in data security posture over time.
- Reviewed DSPM recommendations to understand current risk and identify next steps.
Next step
Step 4: Take action and investigate with Security Copilot
Microsoft source · Retrieved 7 September 2026.
Step 4: Take action and investigate with Security Copilot
This guide is divided into four steps:
- Introduction
- Step 1: Establish foundational elements
- Step 2: Configure access and analytics
- Step 3: Understand data landscape and risks
- Step 4: Take action and investigate with Security Copilot (this article)
Source diagram — Deploy and use Microsoft Purview Data Security Posture Management (DSPM) deployment blueprint. (IMG04: original image). Full text/table diagram conversion.
With a clear understanding of your data landscape and risks from Step 3, this step focuses on taking action. Use Data Security Posture Management (DSPM) recommendations to create policies that mitigate identified risks, and use Microsoft Security Copilot to investigate specific users and activities.
Create DLP and Insider Risk Management policies based on DSPM recommendations
Use DSPM recommendations to create Data Loss Prevention (DLP) and Insider Risk Management policies that address identified risks. DSPM provides step-by-step guidance to create policies without leaving the DSPM page.
- Select Recommendations and choose a recommendation to review.
- Select the option to create a DLP or Insider Risk Management policy based on the recommendation.
- Follow the step-by-step guidance to configure and create the policy.
- Review the policy settings and submit.
Note
It takes a few minutes to create each policy and about 24 hours for the triggering event to take effect. You can find created policies on each solution's page (DLP or Insider Risk Management). Creating policies can generate additional recommendations that help with policy updates and tuning.
Administrators can also use the guidance to update existing policies instead of creating new policies. Recommendations are updated accordingly following administrator actions.
Investigate users with Microsoft Security Copilot in DSPM recommendations
Use Microsoft Security Copilot within DSPM to investigate users involved in recommendations. Security Copilot provides an AI-powered investigation experience that helps you understand user activities and risks in context.
- In a DSPM recommendation, select Show Users Involved to start an interaction with Security Copilot.
- Use follow-up prompts to deep dive into the activity surrounding the recommendation.
- Alternatively, open Security Copilot from the top of the DSPM page to investigate any action or user.
Example prompts for investigation:
- "Provide a list of events where sensitive files were shared externally."
- "List all the sensitive files that were uploaded to cloud in the last week."
- "Show me the data activities for user [UPN] in the last 30 days."
To learn more, see Data Security Posture Management with Security Copilot.
Use Promptbooks and Copilot Prompt Gallery for guided investigations
Use DSPM Promptbooks and the Copilot Prompt Gallery to run guided investigations with curated prompt sequences. These resources help administrators get started with overall investigations or find deeper insights.
- Risky user investigation Promptbook: A six-prompt sequence designed to aid in identifying users handling sensitive data, show their data activities, anomalies, and related alerts. Input a user principal name (UPN) and a timeframe (maximum of 30 days).
- Sensitive data protection Promptbook: A six-prompt sequence to identify and protect sensitive data across the organization and suggest recommended policy changes and DLP rules. Input a SIT or label, and a duration (maximum of 30 days).
- Copilot Prompt Gallery: Includes sample prompts to aid in investigations across five categories: alerts and policies, data at risk, potentially risky users, potentially suspicious activity, and sensitive data.
To learn more, see Data Security Posture Management with Security Copilot - Copilot Prompt Gallery.
Plan a monthly iteration cycle
After completing all four steps, establish a monthly iteration cycle to continuously improve your data security posture:
- Review DSPM reports and trends to identify changes in your data landscape.
- Review DSPM recommendations to understand current risk and determine next steps.
- Create or update DLP and Insider Risk Management policies based on new recommendations.
- Investigate flagged users and activities with Security Copilot.
- Assess overall risks and strengthen your data security posture.
To learn more, see Learn about Data Security Posture Management.
Summary
At the end of this step, your organization has:
- Created DLP and Insider Risk Management policies from DSPM recommendations to mitigate identified risks.
- Used Security Copilot to investigate users and activities associated with recommendations.
- Used promptbooks and Copilot Prompt Gallery for guided investigations.
- Established a monthly iteration cycle to continuously improve data security posture.
Next step
Return to the Deploy and use Data Security Posture Management introduction, or explore other Microsoft Purview deployment models.
Full diagram conversion — Data Security Posture Management
Image title: Microsoft Purview Data Security Posture Management (DSPM). Source: IMG04. No revision date or effort estimate is printed.
Conversion convention (editorial): The image has a capability architecture above a five-part operating ribbon. Undirected Mermaid connections reproduce the architecture’s connector lines without adding packet-flow or execution-direction claims. The ribbon is converted separately as a sequence. All content in the architecture’s boxes is transcribed in the tables below.
DSPM connects analytics with security action
Scroll sideways to read the full diagram →
View diagram source
flowchart LR
subgraph Analytics["Analytics"]
DLP["Microsoft Purview Data Loss Prevention"]
IP["Microsoft Purview Information Protection"]
IRM["Microsoft Purview Insider Risk Management"]
end
DLP --- DSPM["DSPM"]
IP --- DSPM
IRM --- DSPM
DSPM --- Discover["Discover<br/>Trends and analytics reports to track and understand activities"]
DSPM --- Protect["Protect<br/>Recommendations"]
DSPM --- Investigate["Investigate<br/>Security Copilot-based investigation for deeper Insights"]
DSPM context box
| Item | Text from image |
|---|---|
| 1 | Sensitive information types (SITs) – custom included |
| 2 | Trainable classifiers |
| 3 | Sensitivity labels |
| 4 | Content analysis |
| 5 | Risk indicators from Microsoft Graph logs |
| 6 | Adaptive Protection |
Discover — Trends and analytics reports to track and understand activities
| Item | Text from image |
|---|---|
| 1 | Sensitive assets labeled (automatically and manually) |
| 2 | Sensitive assets protected by at least one data loss prevention (DLP) policy |
| 3 | Potentially risky users |
| 4 | Unprotected sensitive assets across data sources report: reveals where sensitive assets with no protection exist across data sources |
| 5 | Users performing top risk-related activities on unprotected sensitive assets report: shows which users have accessed and/or performed high-risk actions on unprotected sensitive data |
Protect — Recommendations
| Item | Text from image |
|---|---|
| 1 | Transforms raw data discovery into actionable security measures, strengthening an organization’s security posture and enabling the creation of critical policies with just a few clicks |
| 2 | Enables tailored recommendations for specific organizational risks, focusing on DLP or Insider Risk Management (IRM) and addressing high-priority threats through correlated DLP and IRM policies |
Investigate — Security Copilot-based investigation for deeper Insights
| Item | Text from image |
|---|---|
| 1 | Suggested prompts |
| 2 | Open prompt investigation |
| 3 | Copilot Prompt Gallery: list of prompts that can be used from five categories: alerts and policies, data at risk, potentially risky users, potentially suspicious activity, and sensitive data |
| 4 | Promptbooks: curated, task-focused prompt sequences designed to help security teams detect, investigate, and remediate issues efficiently |
Operating ribbon
From analytics opt-in to posture tracking
Scroll sideways to read the full diagram →
View diagram source
flowchart LR
A["Opt-in to analytics processing"] --> B["Evaluate insights and act"]
B --> C["Investigate with Security Copilot"]
C --> D["Create policies with recommendations"]
D --> E["Track posture with analytics trends and reports"]
- Opt-in to analytics processing.
- Evaluate insights and act.
- Investigate with Security Copilot.
- Create policies with recommendations.
- Track posture with analytics trends and reports.
Editorial distinction: The step pages make Security Copilot optional. The ribbon includes it visually; the image has no monthly return arrow. The monthly iteration instruction is retained in the article text above. Brackets and lines associate the three input products with Analytics and the six-item DSPM context with the three output capabilities.
Lightweight guide to mitigate data leakage
Collection index · Source and completeness register
Conversion note (editorial): The source article text, examples, procedures, callouts and contextual links are retained. Section heading levels and model-navigation links are adapted for this combined Markdown file. Source claims are reproduced as published; separate editorial notes do not alter them. Diagrams are transcribed separately below.
Contents (editorial navigation)
Microsoft source · Retrieved 7 September 2026.
Lightweight guide to mitigate data leakage
This deployment model enables core data security capabilities with minimal configuration, focusing on essential steps to get started quickly. It's designed for organizations that want to protect confidential data across their Microsoft 365 estate using a progressive Good/Better/Best approach.
The model uses Microsoft Purview Information Protection and Data Loss Prevention (DLP) to establish foundational data security, then progressively expands protection to endpoints, automates classification, and enables continuous improvement through Microsoft Purview Insider Risk Management and Adaptive Protection.
About this guide
This guide includes the following articles:
- Introduction (this article)
- Step 1: Establish foundational data security
- Step 2: Expand protection to endpoints
- Step 3: Continuous improvement
These articles cover:
- How to create and deploy sensitivity labels and DLP policies with minimal configuration.
- How to expand protection to endpoints, Microsoft Teams, and email with custom sensitive information types (SITs) and auto-labeling.
- How to encrypt files, extend service-side auto-labeling, and enable Adaptive Protection for dynamic risk-based policies.
Before you begin
This guide is for administrators with knowledge of Microsoft Purview Information Protection and Data Loss Prevention (DLP). If you're new to these solutions, refer to these articles to learn more:
Licensing and subscriptions
Features in this guide start at Microsoft 365 Business Premium and expand to E5 Compliance for advanced capabilities. See the licensing notes in each step for details.
For information on licensing, see Microsoft 365, Office 365, Enterprise Mobility + Security, and Windows 11 Subscriptions for Enterprises.
Deployment overview
The deployment model uses a progressive Good/Better/Best approach:
| Step | Level | Description | Outcome |
|---|---|---|---|
| Step 1: Establish foundational data security | Good | Create sensitivity labels, set defaults, deploy basic DLP policies, and enable auditing. | Foundational data security with minimal configuration. |
| Step 2: Expand protection to endpoints | Better | Create custom SITs, configure client-side auto-labeling, and deploy DLP for Teams, endpoints, and email. | Expanded protection with automated classification. |
| Step 3: Continuous improvement | Best | Encrypt files, extend service-side auto-labeling, and enable Adaptive Protection. | Continuous improvement of data security practices. |
Note
Review the suggested efforts and adjust the timelines based on your tenant size and organizational complexity.
Microsoft Purview deployment blueprint
Next step
Step 1: Establish foundational data security
Microsoft source · Retrieved 7 September 2026.
Step 1: Establish foundational data security
This guide is divided into three steps:
- Introduction
- Step 1: Establish foundational data security (this article)
- Step 2: Expand protection to endpoints
- Step 3: Continuous improvement
This step establishes foundational data security with minimal configuration. You create sensitivity labels, set default labels for new content, deploy basic Data Loss Prevention (DLP) policies, and enable audit logging. All features in this step are available with Microsoft 365 Business Premium or above.
Create sensitivity labels
Create sensitivity labels in Microsoft Purview to classify and protect content across Microsoft 365.
- Define parent labels (for example, Confidential and General) scoped to Files and other data assets.
- Configure protection settings such as content marking.
- Repeat to create additional parent labels as needed.
Create sensitivity sub-labels
Create sub-labels under parent labels to apply more granular protection within a broader classification.
- Create an AllEmployees sub-label under the Confidential parent label.
- Scope the sub-label to Files and SharePoint sites.
- Configure protection settings such as content marking.
Order labels by priority
Label priority determines which sensitivity label is applied when multiple labels match the same content. The highest priority label is typically the one with the most restrictive protections.
- Move less sensitive or default labels down (closer to 0).
- Move highly sensitive labels up numerically.
- Verify the most restrictive protections have the highest priority.
Publish sensitivity labels and set a default
Publish your labels to ensure users can see and use them, then set a default label so new documents are automatically classified.
- Publish all sensitivity labels to All users and groups.
- Set the default label for documents to Confidential/AllEmployees.
- Name your policy and save.
Enable sensitivity labels for SharePoint and OneDrive
Enable sensitivity labels for SharePoint and OneDrive so Microsoft Purview can recognize and enforce labels on files stored in these locations. This feature allows documents to inherit labels from libraries.
Note
If the enablement banner isn't displayed in Information Protection, the feature is likely already enabled for your organization.
Create and deploy basic DLP policies
Create DLP policies for Exchange, SharePoint, and OneDrive to prevent sharing of labeled content.
- Create a custom DLP policy for Exchange email (best practice is to have a separate policy for email).
- Create a custom DLP policy for SharePoint sites and OneDrive accounts.
- For each policy, set conditions to detect content labeled Confidential/AllEmployees.
- Set the action to block sharing with people outside the organization.
- Turn on the policies immediately.
Enable audit logging
Enable audit logging to track user and administrator activity across Microsoft 365, including Microsoft 365 Copilot interactions. Auditing is usually enabled by default - confirm it's active to ensure no gap in visibility.
Note
You must be assigned the Audit Logs role in Exchange Online to turn auditing on or off.
Summary
At the end of this step, your organization has:
- Sensitivity labels and sub-labels created and published to all users.
- A default label (Confidential/AllEmployees) applied to new documents.
- Sensitivity labels enabled for SharePoint and OneDrive.
- Basic DLP policies preventing external sharing of labeled content.
- Audit logging enabled to track user and administrator activity.
Next step
Step 2: Expand protection to endpoints
Microsoft source · Retrieved 7 September 2026.
Step 2: Expand protection to endpoints
This guide is divided into three steps:
- Introduction
- Step 1: Establish foundational data security
- Step 2: Expand protection to endpoints (this article)
- Step 3: Continuous improvement
With foundational data security in place from Step 1, this step expands protection to endpoints and automates classification. You create custom sensitive information types (SITs), configure client-side auto-labeling, and deploy Data Loss Prevention (DLP) policies for Microsoft Teams, endpoints, and email. Features in this step require Microsoft 365 Information Protection Governance (IPG) or above.
Create custom sensitive information types
Create custom SITs to detect and classify data unique to your organization. Custom SITs can be used in auto-labeling and DLP policies.
| Name | Pattern type | Example match |
|---|---|---|
| Employee ID | Regex | EMP-123456 |
| Internal project code | Keyword list | Project Falcon, Orion, Phoenix |
| Proprietary source code | Regex + keyword | Code snippets containing 'internal_use=true' near class or function |
- Define the name, description, and confidence levels for each custom SIT.
- Configure the primary element (keyword list, regex, or function), character proximity, and supporting elements.
- Save and publish the custom SIT.
Configure client-side auto-labeling
Configure client-side auto-labeling to classify and protect content as users create or edit it in Microsoft 365 apps like Word, Excel, and Outlook.
- Edit the Confidential/AllEmployees label and enable Auto-labeling for files and emails.
- Add conditions by using your custom SITs.
- Set the action to Recommend that users apply the label rather than automatically applying it.
Tip
Start with recommending labels rather than auto-applying them. This approach gives users the opportunity to review and accept the recommendation, reducing friction during initial deployment.
Create a DLP policy for endpoints
Create an Endpoint DLP policy to prevent sensitive data from being copied to USB drives, printed, or uploaded to unapproved apps. To learn more about Endpoint DLP, see Learn about Endpoint data loss prevention.
- Create a custom DLP policy with Devices as the location.
- Set conditions to detect content containing custom SITs or the Confidential/AllEmployees sensitivity label.
- Set actions to block copy to USB, print, clipboard, or browser upload.
- Run in simulation mode or turn on the policy immediately.
Create a DLP policy for Microsoft Teams
Create a DLP policy to prevent sensitive data from being shared in chat or channel messages with external users or guests.
- Create a custom DLP policy with Teams chat and channel messages as the location.
- Set conditions to detect content containing custom SITs or the Confidential/AllEmployees sensitivity label.
- Add a condition for Content is shared from Microsoft 365 with people outside my organization.
- Set the action to Block only people outside your organization.
- Run in simulation mode or turn on the policy immediately.
Apply DLP to email with custom SITs and label inheritance
Create a DLP policy for email that detects sensitive information in emails and attachments and enables email label inheritance so the email automatically adopts the most restrictive sensitivity label from attached or linked files.
- Create a custom DLP policy with Exchange mail as the location (best practice is to have email as its own DLP policy workload).
- Set conditions for content shared with people outside my organization containing the Confidential/AllEmployees sensitivity label.
- Set the action to Restrict access or encrypt the content in Microsoft 365 locations.
- Run in simulation mode and optionally turn on automatically after 15 days.
Summary
At the end of this step, your organization has:
- Custom SITs detecting organization-specific data in auto-labeling and DLP policies.
- Client-side auto-labeling recommending labels as users create or edit content.
- Endpoint DLP policies preventing sensitive data from being copied to USB drives, printed, or uploaded.
- Teams DLP policies blocking external sharing of sensitive content in chats and channels.
- Email DLP policies with label inheritance protecting sensitive email communications.
Next step
Step 3: Continuous improvement
Microsoft source · Retrieved 7 September 2026.
Step 3: Continuous improvement
This guide is divided into three steps:
- Introduction
- Step 1: Establish foundational data security
- Step 2: Expand protection to endpoints
- Step 3: Continuous improvement (this article)
With foundational security and expanded endpoint protection in place, this step focuses on continuous improvement. You apply encryption to labeled content, extend auto-labeling to files at rest, and enable risk-based Adaptive Protection. Features in this step require Microsoft 365 E5 Compliance or above.
Apply encryption to labeled content
Configure sensitivity labels to automatically apply encryption to files labeled with high-sensitivity sub-labels or containing critical sensitive information types (SITs). Encryption ensures only authorized users can access the content, even if it's shared externally.
- Edit the high-sensitivity sub-labels and select Control access under Items.
- Choose Assign permissions now.
- Set expiration and offline access settings.
- Assign permissions to users or groups.
Extend service-side auto-labeling to Microsoft 365 services
Configure service-side auto-labeling to automatically label existing files in SharePoint and OneDrive, as well as emails in transit through Exchange. Service-side auto-labeling ensures that historical content is labeled based on its sensitivity, not just new content created by users.
- Create an auto-labeling policy and choose the label to auto-apply.
- Choose locations: Exchange, SharePoint, and OneDrive.
- Define conditions using your custom SITs.
- Run the policy in simulation mode and optionally set it to automatically apply after 7 days.
Run Microsoft Purview Insider Risk Management analytics
Use Insider Risk Management analytics to detect risky user activities such as data leaks, exfiltration, or policy violations. Analytics provides recommendations using built-in policy templates to help you address the top risks in your organization.
- Turn on analytics in the Insider Risk Management overview.
- Review results and select View details to get recommended policies based on your top risks.
- Create a policy defining users or groups to monitor and customizing triggers as needed (for example, DLP alerts, label changes, file downloads).
Enable Adaptive Protection in Data Loss Prevention policies
Enable Adaptive Protection to dynamically adjust Data Loss Prevention (DLP) policies based on a user's risk level. Adaptive Protection allows low-risk users to take certain actions while blocking high-risk users, balancing data security with productivity.
- Enable Adaptive Protection in Insider Risk Management > Adaptive Protection settings.
- Configure the thresholds for Minor, Moderate, and Elevated risk levels to align with your risk tolerance.
- Edit a DLP policy and add a condition for Insider risk level for Adaptive Protection is > Elevated risk level.
- Set actions to block file activities for elevated-risk users.
Enable Adaptive Protection for dynamic Conditional Access policies
Configure Adaptive Protection with Conditional Access policies that dynamically restrict access when a user is flagged as high risk. Conditional Access policies can automatically restrict access to sensitive SharePoint sites and OneDrive content for elevated-risk users.
- In Insider Risk Management, select Adaptive Protection > Conditional Access > Create Policy.
- In the Microsoft Entra admin center, select the Insider risk condition and toggle it On.
- Select Target resources > SharePoint and OneDrive.
- Under Access controls, select Block access.
- Enable the policy in Report-only mode or On.
Summary
At the end of this step, your organization has:
- Encryption applied to content labeled with high-sensitivity sub-labels.
- Service-side auto-labeling classifying existing files in SharePoint, OneDrive, and emails in transit.
- Insider Risk Management analytics identifying top risks with recommended policies.
- Adaptive Protection dynamically adjusting DLP policies based on user risk levels.
- Conditional Access policies restricting elevated-risk users from accessing sensitive SharePoint and OneDrive content.
Next step
Return to the Lightweight guide to mitigate data leakage introduction, or explore other Microsoft Purview deployment models.
Full diagram conversion — lightweight data leakage protection
Image title: Lightweight guide to mitigate data leakage. Subtitle: Protect confidential data across M365 estate. Source: IMG05, on the overview page.
Conversion convention (editorial): This image is absent from the introduction’s otherwise empty blueprint section. Its three columns, all 12 activities, outcomes, efforts and effort footnote are transcribed here. No revision date or licensing tiers appear in the image; licensing statements remain in the source article text above.
Build protection from good to better to best
Scroll sideways to read the full diagram →
View diagram source
flowchart LR
G["Good<br/>Establish foundational data security with minimal configuration"] --> B["Better<br/>Expand protection to endpoints and automate classification"]
B --> X["Best<br/>Continuous improvement of data security practices"]
| Level | Activity heading | Full activity text from image |
|---|---|---|
| Good | Create sensitivity and sub labels | Define and publish a ‘Confidential/AllEmployees’ label for files and SharePoint sites |
| Good | Set default label | Automatically apply ‘Confidential\AllEmployees’ label to new files created in M365 |
| Good | Apply basic DLP policy | Block sharing of labeled content via SharePoint, OneDrive and Exchange |
| Good | Enable Audit logging | Track user and admin activity across M365 |
| Better | Create custom SITs | Detect and classify data unique to your organization, like internal project codes, intellectual property |
| Better | Configure client-side auto-labeling | Use custom-built SITs and auto-apply labels in Office apps as users create or edit content |
| Better | Enable Teams and Endpoint DLP | Create policies to block sensitive files from USB copy, printing, sharing externally, etc. |
| Better | Apply email protection | Use DLP to block emails with custom-built SITs and auto-label the email to inherit highest sensitivity from any attached or linked files |
| Best | Encrypt files | Apply encryption to content labeled with high-sensitivity sub-labels or containing critical SITs |
| Best | Extend service-side auto-labeling | Auto-label existing files and emails in transit across SharePoint, OneDrive, Exchange |
| Best | Run Insider Risk Mgmt Analytics | Identify top risks and receive recommendations on pre-built policies to configure |
| Best | Enable Adaptive Protection | Dynamically adjust DLP and Conditional Access policies based on user’s risky activity |
| Level | Outcome text | Effort text |
|---|---|---|
| Good | Establish foundational data security with minimal configuration | 1–2 weeks |
| Better | Expand protection to endpoints and automate classification | 2–4 weeks |
| Best | Continuous improvement of data security practices | 1–2 weeks |
Effort footnote: Suggested efforts should be reviewed into timelines based on your tenant size and organizational complexity.
Visual relationships (editorial): Each column groups activities above its outcome and effort. Downward markers associate the activities with the corresponding outcome; the check mark indicates completion. M365 means Microsoft 365, SIT means sensitive information type, DLP means Data Loss Prevention, and Mgmt means Management. Differences between automatic application in the image and recommendations in Step 2 remain explicit in editorial notes.
Reduce false positives by using SITs and advanced classifiers
Collection index · Source and completeness register
Conversion note (editorial): The source article text, examples, procedures, callouts and contextual links are retained. Section heading levels and model-navigation links are adapted for this combined Markdown file. Source claims are reproduced as published; separate editorial notes do not alter them. Diagrams are transcribed separately below.
Contents (editorial navigation)
Microsoft source · Retrieved 7 September 2026.
Reduce false positives by using SITs and advanced classifiers
Accurate data identification and classification is the foundation of robust data security. It enables enterprises to confidently deploy data protection policies across their digital estate. Microsoft Purview supports this critical step with sensitive information types (SITs) and advanced classification technologies such as Exact Data Match (EDM), trainable classifiers, and document fingerprinting.
However, to control the volume of false positives, you need to configure and apply these tools in the right contexts and scenarios. A false positive means that the system incorrectly flags something as a match even though it isn't. False positives:
- Increase alert fatigue: Overwhelms security and compliance teams, increasing the probability of genuine risks slipping through.
- Drain time and resources: Verification of false positives leads to escalation of operational costs, especially for enterprises handling high data volumes.
- Create unnecessary obstructions: Access restrictions incorrectly applied on content that isn't sensitive leads to friction in workflows and productivity.
- Reduce user trust: Lowers overall product adoption.
Therefore, it's important to have a clear understanding of the utility and relevance of SITs and advanced classifiers for the diversity of business scenarios in an enterprise.
About this guide
This guide includes the following articles:
- Introduction (this article)
- Step 1: Configure pattern-based sensitive data detection
- Step 2: Implement Exact Data Match for precise matching
- Step 3: Use trainable classifiers for complex content
- Step 4: Apply document fingerprinting for templates
Before you begin
This guide is for administrators with knowledge of Microsoft Purview Data Loss Prevention (DLP) and classification technologies. If you're new to these solutions, see the following articles to learn more:
- Learn about sensitive information types
- Learn about exact data match based sensitive information types
- Learn about trainable classifiers
- About document fingerprinting
Classification technologies overview
| Classification technology | Typical use case | Why? |
|---|---|---|
| SITs | Identification of common sensitive data types that are widely recognized and follow standardized patterns. For example, credit card numbers, SSNs. | Quickly deployable with minimal configuration, along with built-in support. |
| Exact Data Match | Scenarios requiring precise data matching from a known data source. For example, detecting specific customer account numbers, employee IDs, or patient IDs. | Minimizes false positives by only flagging data that matches exactly to entries in the uploaded reference data table. |
| Trainable classifier | Identifying complex and contextual data, documents with varied structure and unpredictable format where traditional patterns don't apply. For example, legal documents with varying clauses and formats. | Provides a customizable and intelligent approach to complex data types. |
| Document fingerprinting | Use cases where document template and formatting are consistent across the organization. For example, business contracts, invoices, RFPs, or standard forms containing sensitive data. | Provides targeted protection for critical, structured documents. |
Deployment overview
The deployment model breaks the approach into four steps, each focusing on a different classification technology:
| Step | Classification technology | Description |
|---|---|---|
| Step 1: Configure pattern-based sensitive data detection | Sensitive information types (SITs) | Choose, customize, and refine SITs for accurate pattern-based detection. |
| Step 2: Implement Exact Data Match for precise matching | Exact Data Match (EDM) | Use hashed reference data for precise identification of known sensitive data. |
| Step 3: Use trainable classifiers for complex content | Trainable classifiers | Use AI-driven classifiers for complex content that doesn't follow standard patterns. |
| Step 4: Apply document fingerprinting for templates | Document fingerprinting | Detect specific document templates and fixed-format documents. |
Microsoft Purview deployment blueprint
Source diagram — Screenshot of Reduce false positives by using SITs and advanced classifiers - Blueprint. (IMG06: original image). Full text/table diagram conversion.
Scenario-based data classification strategies
The following table provides deployment guidance with examples of the recommended data classification techniques for different scenarios.
| Scenario | Preferred method | Alternative methods | Techniques to reduce false positives |
|---|---|---|---|
| Detect PII/PHI for known individuals (customers or patients) | EDM for data from LoB app extract | Custom SITs including employee ID + common PII SITs (for example, SSN) | If you use regular SITs, consider requiring the presence of All Full Names, and limit rules to documents with more than a certain minimum match count. |
| Detect PII/PHI for employees or contractors | EDM for data from HR system extract | Custom SITs including employee ID + Named Entities (for example, all full names) + common PII SITs | If you use regular SITs, consider requiring the presence of All Full Names, and limit rules to documents with more than a certain minimum match count. |
| Detect forms with personal data | Form fingerprinting + standard SITs or fingerprinting + custom SITs | Custom SITs + OCR (for scanned forms) | Use EDM instead of custom SITs if not using fingerprinting. |
| Contracts, legal documents, or other business forms | Custom trainable classifiers (+ OCR) | Built-in trainable classifiers + OCR | Identify documents in your organization that the built-in TC correctly identifies, copy them to a repository, and use them to train a custom TC. |
| Important contracts or other documents | Trainable classifier + sensitivity label | Trainable classifier + custom SIT (for example, regex to detect monetary amounts over $100K) | Combine multiple TCs in a single rule, for example, "Contracts" and "Documents about Project X." |
| General PII or PHI of unknown individuals | Built-in SITs if available or custom SITs | Manual labeling | Copy and edit an existing SIT to fine-tune its keyword requirements. Add requirements for named entities such as All Full Names. |
| Scanned identity cards (or similar) | Built-in or custom SITs + OCR | Custom SIT with keyword lists + OCR | Add requirements for Named Entities (names or addresses) if expected to be written in one line. |
| Project data | Location-based labeling (for example, default label for library) | Manual labeling or custom trainable classifiers | Once location-based labeling identifies enough relevant documents, use them to train a custom TC. |
Optimize DLP policy configuration
When you use classifiers in your Data Loss Prevention (DLP) policies, adjust the instance count to reduce false positives. Keep the minimum threshold for instance count at a higher value when small or trivial occurrences of sensitive data don't require action. However, when your business context demands tightened data security, use a lower instance count to block even a single occurrence. Tailor the instance count to the sensitivity level of the data.
Content Explorer is your central hub for discovering sensitive content across your data estate. It provides exhaustive visibility into the types and locations of sensitive data. By tuning instance thresholds and setting the appropriate confidence levels for detection, you can ensure alerts are triggered only when the context aligns with your organizational risk posture.
Next step
Step 1: Configure pattern-based sensitive data detection
Microsoft source · Retrieved 7 September 2026.
Step 1: Configure pattern-based sensitive data detection
This guide is divided into four steps:
- Introduction
- Step 1: Configure pattern-based sensitive data detection (this article)
- Step 2: Implement Exact Data Match for precise matching
- Step 3: Use trainable classifiers for complex content
- Step 4: Apply document fingerprinting for templates
Source diagram — Screenshot of Reduce false positives by using SITs and advanced classifiers - Blueprint. (IMG06: original image). Full text/table diagram conversion.
To use sensitive information types (SITs) for data security across your digital enterprise, it's important to have a comprehensive view of your data estate. Map the sensitive data first to identify what types of sensitive data exist in your enterprise and where it resides.
Choose from built-in SITs and customize if needed
Start with the built-in SITs provided by Microsoft. If they don't suit your needs as is, clone and edit them to make them precisely relevant to your business context.
- Use built-in SITs: Start with the SITs provided by Microsoft Purview. To learn more, see Learn about sensitive information types.
- Clone and edit: If built-in SITs don't fully meet your needs, clone and customize them. To learn more, see Customize a built-in sensitive information type.
- Create custom SITs: Create your own SITs from scratch to address your organization's unique data classification needs. Use multiple patterns in a single SIT definition to ensure comprehensive identification. For example, a SIT created to identify date-of-birth should account for different formats (DD/MM/YYYY, MM/DD/YYYY, and so on). To learn more, see Create custom sensitive information types.
- Test with on-demand classification: Use the on-demand classification capability in Microsoft Purview to test your custom SITs against targeted data samples. This capability enables quick iteration by observing real detection behavior in a controlled scope.
- Use multiple SITs in DLP policy rules: Create a more comprehensive and precise detection strategy by using multiple SITs. For instance, when detecting PII, choose a combination of SITs that cover SSN, driving license number, passport number, and so on, with an OR condition instead of depending solely on a single SIT.
Identify appropriate primary element type in SIT configuration
When you define the primary element, choose from four options: Regular expression (regex), Keyword list, Keyword dictionary, or Function. Follow these recommendations for each type:
| Primary element type | Key recommendations |
|---|---|
| Regular expression | Use lookaround assertions to ensure context and reduce irrelevant matches. Validate regex patterns against diverse datasets. If you need to detect isolated strings, use \b at the beginning and end, or select "word match" instead of "string match." You can enhance detection by using other built-in validators with logic that isn't possible by using regular expressions only. |
| Keyword list | Use casing capability based on whether exact casing is required. In space-delimited languages, use "word match" instead of "string match" for better accuracy. For non-space-delimited languages like Chinese, Japanese, Thai, and Korean, "string match" improves classification accuracy by detecting keywords embedded inside larger words. |
| Keyword dictionary | Use this type over keyword list when you need easier management of keywords at a larger scale. Be mindful of the limit of 1 MB of compressed text across all dictionaries in the tenant. Keyword dictionaries are always case insensitive. |
| Function | Identify the appropriate function from a list of predefined functions. These functions behave in a similar way to regular expressions but with more programmatic functionality. |
To learn more, see Learn about sensitive information types.
Refine using proximity elements, confidence level, and exclusions
- Add supporting elements: Provide supporting elements as corroborative evidence alongside the primary element. For example, simply matching a date format for date-of-birth can lead to massive false positives from email headers and timestamps. Adding supporting keywords (DOB, DateOfBirth) ensures only high-confidence matches.
- Set proximity limits: Set the proximity limit to 300 characters for any new custom SIT. Avoid configuring unlimited proximity ("anywhere in the document"), as it leads to too many false positives. For large tabular data, use the
RelaxProximityoption configurable by using PowerShell. - Configure confidence levels: Specify a higher confidence level for patterns with more supporting elements or more restrictive regular expressions. Set the confidence level to low if the SIT has few or no supporting elements.
- Use exclusions: Include or exclude specific text and patterns, prefixes, or suffixes to further improve match accuracy.
- Test your configuration: Use the test functionality to validate your SIT's accuracy, and use Content Explorer to review detected matches.
To learn more, see Test a sensitive information type.
Provide match and not-a-match feedback for identified items
Regularly submit your feedback for all matched items to help Microsoft tune its SITs. For every item in SharePoint and OneDrive, Microsoft Purview allows you to provide feedback in terms of whether it's a match (true positive) or not a match (false positive). You can also choose to submit a redacted version of the item to Microsoft to help improve the accuracy of built-in SITs.
Summary
At the end of this step, your organization has:
- Built-in and custom sensitive information types (SITs) configured for your organization's data classification needs.
- Primary elements defined with appropriate regex, keyword, dictionary, or function patterns.
- Proximity limits, confidence levels, and exclusions refined to reduce false positives.
- Feedback loop established to continuously improve SIT accuracy.
Next step
Step 2: Implement Exact Data Match for precise matching
Microsoft source · Retrieved 7 September 2026.
Step 2: Implement Exact Data Match for precise matching
This guide is divided into four steps:
- Introduction
- Step 1: Configure pattern-based sensitive data detection
- Step 2: Implement Exact Data Match for precise matching (this article)
- Step 3: Use trainable classifiers for complex content
- Step 4: Apply document fingerprinting for templates
Source diagram — Screenshot of Reduce false positives by using SITs and advanced classifiers - Blueprint. (IMG06: original image). Full text/table diagram conversion.
Microsoft Purview helps you identify specific known sensitive data in your data estate by using Exact Data Match (EDM). EDM minimizes false positives by only flagging data that matches exactly to entries in an uploaded reference data table.
To learn more about EDM and how it works, see Learn about exact data match based sensitive information types.
Use well-known information to define the EDM schema
Upload a sample file and use the automation provided by Microsoft Purview to define the schema. The schema defines the structure of your reference data table, including the columns that contain sensitive data and the columns that provide corroborative evidence.
To learn more, see Get started with exact data match based sensitive information types.
Map primary element to a strongly defined SIT
Select as primary elements columns that contain strongly patterned data, such as SSNs or credit card numbers, and use a strongly defined sensitive information type (SIT) as the base SIT for primary elements. When you map the primary field to a loosely defined SIT that covers a broad range of values, the performance of the EDM classifier suffers, resulting in throttling or timeout scenarios that cause missed detections.
Avoid the following examples of "loose" SITs:
- Plain numbers with fewer than five digits (too common).
- Email address SIT that doesn't exclude the company's domain (matches on every email).
- Date of Birth SIT that doesn't exclude recent or future dates.
- All Full Names SIT (produces too many matches and captures superstrings).
- A regex to detect GUIDs (matches on headers of every email).
- A regex that doesn't isolate a single word or sequence - for example, the regex
\d{6}matches on a six-digit number but also numbers with greater than six digits. A better regex would be\b\d{6}\b. - Street address SIT (detects too many variations in the writing).
Ignore delimiters and punctuation to improve match accuracy
Select the option to ignore delimiters and punctuation in the data wherever applicable while defining the schema columns. For instance, a U.S. phone number can be written as +11234567890, or (+1) 123 456 7890, or +1 123-456-7890. By choosing to ignore delimiters and punctuation, you can ensure that each format is identified as a valid match.
To learn more, see Create an EDM SIT schema and rule package.
Use additional columns as correlated evidence for higher confidence matches
Select the appropriate match mode for each column out of the three available options: single-token, multi-token, or a SIT. If you can accurately map any of the supporting evidence fields to a built-in or custom SIT, do so to ensure higher accuracy and improved latency. Avoid using multi-token matching for a field that consistently contains single-token data only.
- For high confidence matches, include a greater number of supporting elements in the defined character proximity range.
- Optionally, create a low confidence pattern with only a lower number of supporting elements, or none if the primary element is accurate enough on its own.
- Select wide mode or narrow mode as the proximity detection mode based on how you want the supporting elements to be checked.
To learn more, see Create an EDM SIT schema and rule package.
Summary
At the end of this step, your organization has:
- An EDM schema defined based on well-known reference data.
- Primary elements mapped to strongly defined SITs to avoid performance issues.
- Delimiters and punctuation configured to improve match accuracy across data formats.
- Additional columns configured as correlated evidence for higher confidence matches.
Next step
Step 3: Use trainable classifiers for complex content
Microsoft source · Retrieved 7 September 2026.
Step 3: Use trainable classifiers for complex content
This guide is divided into four steps:
- Introduction
- Step 1: Configure pattern-based sensitive data detection
- Step 2: Implement Exact Data Match for precise matching
- Step 3: Use trainable classifiers for complex content (this article)
- Step 4: Apply document fingerprinting for templates
Source diagram — Screenshot of Reduce false positives by using SITs and advanced classifiers - Blueprint. (IMG06: original image). Full text/table diagram conversion.
Use trainable classifiers when you need to identify organization-specific or proprietary content that built-in sensitive information types (SITs) or Microsoft-pretrained classifiers can't reliably detect. Trainable classifiers use machine learning to identify document patterns, providing a customizable and intelligent approach to complex data types.
Choose from built-in pretrained classifiers
Use the pretrained ready-to-use trainable classifiers provided by Microsoft. Identify which trainable classifier suits your use case, test it with your sample data to validate that it meets your requirement, and start using it in your policies with no extra effort of manual setup and fine-tuning.
If the built-in trainable classifiers don't meet your needs, create your own custom classifiers based on relevant documents from your organization.
To learn more, see Learn about trainable classifiers.
Seed custom classifiers with a large, diverse set of samples
Train your custom classifier with an adequate number of positive and negative samples of the type of content you want it to detect. If some of the trainable classifiers that Microsoft provides in Microsoft Purview are relevant to your needs but don't provide the necessary accuracy in your environment, use them to detect a large set of documents that are correct matches. Collect them in one location (removing the false positives and adding manually identified relevant documents). Use unrelated documents and documents that were incorrectly matched by the original classifier as negative examples.
This approach ensures that the training set accounts for your specific jargon, names, and other relevant aspects of your information.
To learn more, see Get started with trainable classifiers.
Provide match and nonmatch feedback for identified items
Like the case of SITs, provide regular feedback for each item matched to a trainable classifier to improve the classifier accuracy. If the classifier detects many false positives, remove the custom classifier and create it afresh with a larger and more precise sample data set.
Combine trainable classifiers with SITs for more accuracy
Use the hybrid approach of blending machine learning (with trainable classifier) and rule-based pattern matching (with SIT) to attain higher accuracy. For example, to identify sensitive business contracts exceeding $100K value, pair the pretrained Business Context trainable classifier with a custom SIT that detects contract sums over $100K. You can use these classifiers in DLP policies for comprehensive data protection.
Summary
At the end of this step, your organization has:
- Built-in pretrained classifiers evaluated and deployed where applicable.
- Custom trainable classifiers created with a diverse set of positive and negative samples.
- Feedback loop established to continuously improve classifier accuracy.
- Hybrid approach combining trainable classifiers with SITs for higher accuracy.
Next step
Step 4: Apply document fingerprinting for templates
Microsoft source · Retrieved 7 September 2026.
Step 4: Apply document fingerprinting for templates
This guide is divided into four steps:
- Introduction
- Step 1: Configure pattern-based sensitive data detection
- Step 2: Implement Exact Data Match for precise matching
- Step 3: Use trainable classifiers for complex content
- Step 4: Apply document fingerprinting for templates (this article)
Source diagram — Screenshot of Reduce false positives by using SITs and advanced classifiers - Blueprint. (IMG06: original image). Full text/table diagram conversion.
Use the document fingerprinting technique to detect specific document templates or fixed-format documents that have a consistent structure. Document fingerprinting is most useful when your organization has standardized templates for contracts, invoices, RFPs, or other business forms containing sensitive data.
To learn more, see About document fingerprinting.
Choose a small number of high-value assets
To choose what to fingerprint, identify the high-value or highly sensitive documents that are well-known within your organization. Fingerprint these documents at either "full match" or "high match" rates so you can detect either identical copies of these documents or closely matching variations as they move within or outside the organization.
Use partial matching to detect modified or partial versions
Tune your fingerprint sensitive information type (SIT) to detect content that has a partial match with the fingerprint. This tuning covers cases where there are slight modifications to the standard template on which the fingerprint is defined. For instance, if you want Microsoft Purview to flag items that are at least a 50% match to the fingerprint, define confidence levels as:
- Low: 50% match and above
- Medium: 70% match and above
- High: 90% match and above
Adjust confidence level based on real-world results
If you see many false positives, increase the minimum match threshold and adjust the confidence levels. If you see many false negatives, lower the match threshold. Make this adjustment regularly by carefully analyzing the matched items. For more information about how confidence levels affect DLP policy rule matching, see Data Loss Prevention policy reference.
Set high confidence level value to exact for exact matching
Choose an exact match in document fingerprinting when you're dealing with highly structured, critical documents that require precise identification without room for variation. Otherwise, define a high rate rather than use full rate, since some forms of document conversion (for example, transcription as PDF, addition of a header or footer, or upgrade to a newer file format) can introduce minor modifications that prevent matching at 100%.
Summary
At the end of this step, your organization has:
- High-value document templates identified and fingerprinted.
- Partial matching configured to detect modified or partial versions of templates.
- Confidence levels tuned based on real-world results to balance false positives and false negatives.
- Exact matching configured for critical documents requiring precise identification.
By following this blueprint, you can strategically apply Microsoft Purview's classification technologies - sensitive information types (SITs), Exact Data Match (EDM), trainable classifiers, and document fingerprinting - across different scenarios to maximize detection accuracy while reducing friction.
Next step
Return to the Reduce false positives by using SITs and advanced classifiers introduction, or explore other Microsoft Purview deployment models.
Full diagram conversion — SITs and advanced classifiers
Image title: Reduce False Positives with SITs and Advanced Classifiers. Source: IMG06. No revision date is printed.
Conversion convention (editorial): This is a comparison of four classification technologies. The table preserves the column order without adding a requirement to pass data through each technology in sequence. Each column’s four activities, subtitle, outcome and effort are retained.
| Column heading | Subtitle |
|---|---|
| System classification | Pattern-based sensitive data detection |
| Exact Data Match (EDM) | Precise matching using hashed data |
| Trainable Classifier (TC) | AI-driven custom content classification |
| Document Fingerprinting | Template-based document detection |
| Column | Activity text from image |
|---|---|
| System classification | Choose from the out of box SITs; copy and edit if needed |
| System classification | Identify appropriate primary element type (regex etc.) |
| System classification | Provide match/not-a-match feedback for identified items |
| System classification | Refine using proximity elements, confidence level, and exclusions |
| Exact Data Match (EDM) | Use well-known information file to define the EDM schema |
| Exact Data Match (EDM) | Map primary element to strongly-defined SIT |
| Exact Data Match (EDM) | Ignore delimiters, punctuation to improve match accuracy |
| Exact Data Match (EDM) | Use additional columns as correlated evidence for higher confidence matches |
| Trainable Classifier (TC) | Choose from the out of box pre-trained classifiers |
| Trainable Classifier (TC) | Seed TC with large diverse set of positive/negative samples |
| Trainable Classifier (TC) | Provide match/not-a-match feedback for identified items |
| Trainable Classifier (TC) | Combine with regular SITs for more accuracy (e.g. contract TC + "sum larger than $100K") |
| Document Fingerprinting | Choose small number of high value assets |
| Document Fingerprinting | Use partial matching to detect modified or partial versions |
| Document Fingerprinting | Adjust confidence level based on real-world results |
| Document Fingerprinting | Set high confidence level value to “exact” for exact matching |
| Column | Outcome text | Effort text |
|---|---|---|
| System classification | Well known patterns of data identified | 3 weeks |
| Exact Data Match (EDM) | Match for specific known data ensured | 2 weeks |
| Trainable Classifier (TC) | Data along certain topics or document types with no strict patterns identified | 2 weeks |
| Document Fingerprinting | Well-known document assets strictly matched | 2 weeks |
Visual relationships (editorial): Connected diamonds associate activities within each technology column; shields distinguish headings/outcomes, hourglasses label effort, and the final check mark indicates the completed blueprint. SIT means sensitive information type. The source’s scenario table above supplies the combinations and alternatives; no additional dependencies are inferred from this image.
Editorial notes — separate from Microsoft’s source text
Collection index · Source register
These notes identify source inconsistencies, interpretation boundaries and missing implementation detail. They are not part of the original deployment articles and do not replace or amend the source passages in the full guides. This conversion preserves what Microsoft published on 7 September 2026; it does not independently refresh product limits, licensing or feature availability.
Secure by default
| Source location | Issue to distinguish |
|---|---|
| Step 1 — taxonomy and label table | The top-level Highly confidential description says to share only with named recipients, while its sublabels include All Employees. Both statements are retained. |
| Step 1 — label table | Confidential/All Employees describes full permissions; Highly Confidential/All Employees describes view, edit and reply. Both specify Co-Author in their settings. The user descriptions and actual settings are kept in their original columns. |
| Step 1 — label table | Highly Confidential/Internal exception has the footer “Classified as Confidential” in the source. It has not been silently changed. |
| Step 1 and Step 2 | The general table disables auto-labeling for Highly Confidential/Specific People; the credential-specific client instruction selects it. The service-side credential instruction selects Highly Confidential/All employees. |
| Steps 1–3 | Applying a site/container label, setting a default library file label and labeling historical files are separate actions. Source statements about deriving labels from sites must be read alongside the explicit two-operation procedure and the historical-labeling policies. |
| Step 1 | The label table offers Private or Public site privacy, while the accompanying recommendation says to use Private by default. Label priority can also prevent a General library default from replacing a higher-priority client label or prevent a justification prompt for an Internal exception label. |
| Step 3 | The source says advanced classifiers are limited to trainable classifiers in its auto-labeling discussion, then discusses EDM and fingerprinting for DLP. It also states that EDM/fingerprinting are unavailable for auto-labeling. This source-specific limitation is retained. |
| Step 4 | BYOK/DKE are explicitly outside the model’s scope. The source’s key-management reference and regulatory framing are preserved; the conversion does not equate all different Microsoft key-management features. Non-M365 protection is described as public preview by this page. |
Shadow AI
| Source location | Issue to distinguish |
|---|---|
| Blueprint and Step 3 | The image says to block sensitive data shared through network service providers. The Network Data Security subsection describes detecting it. Both are preserved without substituting one for the other. |
| Step 2 | Managed-network blocking is qualified by unmanaged-device/personal-network access. The later Intune activity addresses managed installations and does not demonstrate control of every unmanaged route. |
| Step 3 | The source broadly describes encrypted content resisting paste/upload to AI. An encrypted artifact and plaintext copied by an authorized user are different data paths; the source also deploys Endpoint DLP and browser controls. |
| Step 4 and blueprint | The article makes broad “all AI interactions” audit claims, while the image’s governance column explicitly names Microsoft Edge. Audit events, collected prompt/response content, retention records and eDiscovery holds are distinct. Workload-specific references determine supported coverage. |
Copilot agents
| Source location | Issue to distinguish |
|---|---|
| Introduction and blueprint | The source outcome says sensitive grounding information is not used as a knowledge source. It is retained as the source’s objective; actual exclusion depends on the selected policy conditions and supported knowledge sources. |
| Step 2 | The Dataverse data-policy subsection links to general Copilot DLP guidance and supplies no detailed Dataverse procedure. No procedure has been invented in the conversion. |
| Step 3 | The article describes conversation-wide sensitivity inheritance and enforcement of associated protection policies. Its verification steps inspect the displayed label; that check alone does not establish every enforcement behavior. |
| Step 3 | Restricting file processing and restricting sensitive prompts in web queries are discussed together. These should not be assumed to be the same condition/action or configuration switch. |
| Step 2 | The source uses retention/deletion policies to reduce stale grounding content. It provides no universal deletion age; organizational retention requirements remain part of its configuration choices. |
Data Security Posture Management
| Source location | Issue to distinguish |
|---|---|
| Introduction, Step 1 and blueprint | Labels are helpful rather than required for DSPM; Security Copilot is optional even though both appear in the foundational path. |
| Blueprint | Architecture connectors associate capabilities; they are not network-flow arrows. The operating ribbon is a separate sequence. Monthly iteration comes from the prose. |
| Steps 2–4 | Role names, the three-day initialization, minutes/24-hour processing statements, 30-day recommendation removal and 30-day Promptbook windows are retained as model statements. A removed recommendation does not itself prove risk remediation. |
Lightweight data leakage protection
| Source location | Issue to distinguish |
|---|---|
| Introduction | The blueprint heading has no image. The overview’s image supplies the complete Good/Better/Best blueprint and is converted at the end of this guide. |
| Blueprint and Step 2 | The image calls for automatic client labeling; the source procedure initially recommends that users apply the label. Both are retained. |
| Step 2 | The Teams policy lists label-based conditions with Teams message locations; email inheritance is described for attached or linked files. The conversion preserves these claims without validating all workload combinations. |
| Steps 1–3 | Business Premium, Information Protection Governance (IPG) and E5 Compliance are the source’s licensing terms. “Or above” is not a complete feature-entitlement matrix. The image itself has no licensing table. |
| Step 2 and Step 3 | The 15-day email-DLP option and seven-day auto-labeling option belong to different workflows. They are not combined into a single rollout delay. |
Classification and false positives
| Source location | Issue to distinguish |
|---|---|
| Introduction — scenario table | The customer/patient row includes employee ID among alternatives. The source row is preserved in full. |
| Step 3 | The source names a pretrained Business Context classifier for its >$100K example. This conversion does not substitute a different classifier or verify that name against the current catalog. |
| Steps 1–2 | Word/string matching advice, the 1 MB dictionary limit, 300-character proximity and RelaxProximity are retained as published. Full names can be corroborative evidence while being a poor EDM primary selector; these are different uses. |
| Step 4 | Setting high confidence to exact is distinct from the separate example’s 90% high-confidence threshold. Both the numerical example and exact-match instruction are kept. |
These notes do not authorize any deployment, policy activation, sample submission, deletion or change to Microsoft services. Such instructions inside the source articles remain document content.
Source and completeness register
Collection index · Verification report
This register covers the freshly fetched Microsoft Learn article bodies, including their next-step sections and contextual links. All 30 pages were retrieved on 7 September 2026. Every page carries ms.date=2026-03-31T00:00:00Z and updated_at=2026-06-15T22:35:00Z; these publisher metadata values are distinct from dates printed inside diagrams.
Source-page coverage
Heading counts include the page title. List counts include nested items. Table counts refer to original source tables; image transcription tables are additional. All listed pages pass text, heading, list, table-cell, link, callout, inline-code and emphasis comparisons.
Image coverage
All seven image assets were fetched and visually inspected. The overview thumbnail and full secure-by-default image are two resolutions of the same blueprint. There are 31 image occurrences across the source pages; each occurrence has a local transcription link at its original position. The lightweight image occurs only in the overview.
Image fingerprints
| ID | SHA-256 |
|---|---|
| IMG01 | d2d13afa1c813781c87febb16ecd0d45f09a38d48a46d2ac7fad44692bba9c22 |
| IMG02 | 844b0ec3603bae8f49f01d56476455dcb26429fb894cfe4db1a68b3ace301ff1 |
| IMG03 | 4152212d3ac264341be48764ce338af95979bac851b6770a1effb7c5c6888d15 |
| IMG04 | cf56688c2c61b940e393f453fb3e440592f7f5fd885dd0dfeddcd194c323145e |
| IMG05 | 504fb1a42a1cfa213d9f19f128fb75c2f09adaa9ee4fe6c137fbd0a0863c3c2b |
| IMG06 | a8e1bd9b20e888a594cd18332d8f3fbb3d23e985b45ef9db621f7bf6d486d28e |
| IMG07 | 672523b4ad51f1ac7e4d49e4761e465a5b33de9c5cc4f2e277bd48bb7395e661 |
Evidence and repeatability
The fresh retrieval manifest records source URLs, full HTML hashes, image hashes, publisher dates and source link inventories. The page map maps every source heading to a local anchor. The content comparison results record each check per source page.
The source HTML, original images, page-by-page Markdown, rendered page fragments and conversion/verification scripts are retained under the evidence directory. The previous collection’s preservation record identifies the unchanged files now in docs/summaries.
Conversion boundary
Only the 30 deployment-model article bodies and seven referenced diagram assets are converted. Referenced feature documentation, licensing pages and external examples retain their original contextual links. No direct PDF is linked from the collected article bodies. Microsoft Learn site navigation, account authorization banners, feedback controls and page chrome are excluded. The overview’s supplementary Copilot blueprint link is included because it is in the article HTML, even though the Learn MCP text response omits that next-step content.
Full-conversion verification — 7 September 2026
Collection index · Page-by-page register · Separate editorial notes
This verification uses a content-preservation standard. The new collection retains the source article text and structure, rather than checking only whether the main subjects appear somewhere in a summary. All 30 source pages pass the comparisons described below. Source image content was transcribed and reviewed separately because ordinary HTML text comparison cannot verify words inside a raster image.
What was rebuilt
The previous folder was renamed to docs/summaries. All 10 files in that folder retain their original bytes, confirmed against the preservation hashes. Their older review claims remain historical content; this report applies to the newly rebuilt collection.
The new collection was created from fresh HTML downloads of the overview, six introductions and 23 deployment steps. Each model retains its introduction and steps in source order, with original source headings, instructions, examples, callouts, tables and contextual references. Repeated source navigation and summaries are retained, including next-step sections that the Microsoft Learn MCP text response can omit.
| Guide | Source pages | Source headings including titles | Result |
|---|---|---|---|
| Overview | 1 | 9 | Pass |
| Secure by default | 5 | 45 | Pass |
| Shadow AI | 5 | 35 | Pass |
| Copilot agents | 5 | 37 | Pass |
| DSPM | 5 | 33 | Pass |
| Lightweight | 4 | 33 | Pass |
| False positives | 5 | 37 | Pass |
Independent content comparison
The converter reads source HTML and produces Markdown. A separate renderer converts that Markdown to HTML. The verifier then compares the rendered result with the original fetched HTML, without using the earlier summaries as an expected result.
| Check | Method | Result |
|---|---|---|
| Text | Compare the complete page title and article-body character sequence after removing whitespace only; retain case, punctuation, digits and order | 30/30 pages match |
| Heading structure | Compare heading text, sequence and nesting, accounting for the documented one-level shift inside combined model files | 229 headings retained |
| Lists | Compare ordered/unordered list type, starting value, item text and recursive nesting | 622 list items retained |
| Tables | Compare all table rows and each cell’s complete text, including the heading cells | 11 tables and 51 data rows retained |
| Links | Compare link text, occurrence order and destination, accounting only for the documented remapping of model-page links to local anchors | 403 link occurrences retained |
| Callouts | Compare each source Note/Tip/Important callout’s full text with its rendered blockquote | 28 callouts retained |
| Code | Compare inline-code contents without whitespace normalization | All source code spans match |
| Emphasis | Compare strong/emphasis tag types, text and order | All source emphasis matches |
| Delivered files | Compare each source-page block in the combined guide with the independently validated page conversion | 30/30 blocks match |
The complete per-page result is recorded in content-validation.json. Text inside images is replaced with tracked placeholders for this comparison; the delivered file places the image reference and transcription link at each corresponding slot. Those substitutions are explicitly excluded from the article-text equality comparison.
Secure-by-default Step 4 acceptance check
The rebuilt Step 4 retains the complete source, including:
- Four operational-review scenarios with their methods and follow-up actions.
- The introduction to iterative labeling scenarios and all individual scenario headings.
- Multi-domain encrypted-label examples and Confidential/Highly confidential scope.
- Tented-project group encryption, publication to the same people, and unpublication behavior.
- Full-time employee, vendor, offshore and regional segmentation, including the local 5×5 instruction.
- Scanner guidance, SharePoint defaults, migration and automatic labeling on upload.
- BYOK/DKE scope, regulatory framing, explanations and contextual product links.
- All five accountability/lifecycle recommendations, including SharePoint Advanced Management and the access-review context.
- Four non-M365 data sources, public-preview wording, portal milestone and full storage/SQL examples.
- Original summary links, including the source’s repeated access-review link, and next-step navigation.
The entire section was also inspected in its rendered screenshot. Editorial discrepancy notes are outside the source text in a separate file.

Diagram review
Every original raster image was visually inspected. Each image transcription was checked item by item against the image, including headings, stage descriptions, ownership markers, outcomes, effort values, dates and meaningful connectors.
| Blueprint | Content checked |
|---|---|
| Secure by default — IMG01/IMG07 | Both resolutions; four stage headings/subtitles; 16 activities; four outcomes; four effort entries; printed date and footer URL |
| Shadow AI — IMG02 | Four stages; 13 activity diamonds, including the combined mixed-product access item; all superscripts and the product key; four outcomes; Edge scope and printed date |
| Copilot agents — IMG03 | Four stages/subtitles; 16 activities; four outcomes; all acronyms and printed date |
| DSPM — IMG04 | Three Analytics input products; six DSPM context elements; five report/trend items; both recommendation descriptions; four investigation items with all five gallery categories; five ribbon stages; undirected architecture connections |
| Lightweight — IMG05 | Title/subtitle; three levels; all 12 full activity descriptions; three outcomes; three efforts; tenant-size/complexity footnote; absence from introduction |
| Classifiers — IMG06 | Four technology headings/subtitles; 16 activities; four outcomes; four efforts; comparison semantics |
There are 31 source image occurrences, all linked to the matching full transcription. The seven asset hashes are recorded in SOURCES.md. Decorative logos/icons are not recreated, and source outcome claims are not strengthened or weakened inside the transcription.
Rendering and navigation
The render results record successful rendering of all six Mermaid diagrams and no horizontal overflow in the overview or six guides at a 1440-pixel viewport. All 11 original source tables were captured and visually inspected; the dense label table uses readable column widths in the verification preview. The diagram contact sheet records the six rendered diagrams.

The link and structure results check local destinations, explicit anchors, duplicate anchors, Markdown table widths, unfinished placeholders, balanced code fences and source/image hashes. The source-page link comparisons independently check every original contextual link occurrence. External references are checked for preservation, not recursively audited for current content or availability.
Boundaries of this result
This result establishes fidelity to the retrieved deployment-model content. It does not certify that all Microsoft source statements are mutually consistent or valid for every current workload, license or tenant. Source issues are recorded separately in EDITORIAL-NOTES.md. No additional tenant procedures were invented to fill gaps in the source.
The evidence and scripts are retained under Resources/purview-full-conversion-2026-09-07. Browser screenshots use a local verification stylesheet; other Markdown viewers can lay out the same content differently. The source tables and accompanying diagram text remain readable without Mermaid support.